Java Swing model architecture
Swing engineers created the Swing toolkit implementing a modified Model View Controller design pattern. This enables efficient handling of data and using pluggable look and feel at runtime.The traditional MVC pattern divides an application into three parts. A model, a view and a cotroller. The model represents the data in the application. The view is the visual representation of the data. And finally the controller processes and responds to events, typically user actions, and may invoke changes on the model. The idea is to separate the data access and business logic from data presentation and user interaction, by introducing an intermediate component: the controller.
The Swing toolkit uses a modified MVC design pattern. The Swing has single UI object for both the view and the controller. This modified MVC is sometimes called a separable model architecture.
In the Swing toolkit, every component has it's model. Even the basic ones like buttons. There are two kinds of models in Swing toolkit.
- state models
- data models
For Swing developer it means, that we often need to get a model instance in order to manipulate the data in the component. But there are exceptions. For convenience, there are some methods that return data without the model.
public int getValue() {
    return getModel().getValue();
}
For example the getValue() method of the JSlider component. The developer does not need to work with the model directly. Instead, the access to the model is done behind the scenes. It would be an overkill to work with models directly in such simple situations. Because of this, the Swing tookit provides some convenience methods like the previous one. To query the state of the model, we have two kinds of notifications.
- lightweight notification
- stateful notification
ChangeListener class. We have only one single event (ChangeEvent)for all notifications coming from the component. For more complicated components, the stateful notification is used. For such notifications, we have different kinds of events. For example the JList component has ListDataEvent and ListSelectionEvent. If we do not set a model for a component, a default one is created. For example the button component has
DefaultButtonModel model public JButton(String text, Icon icon) {
// Create the model
setModel(new DefaultButtonModel());
// initialize
init(text, icon);
}
If we look at the JButton.java source file, we find out, that the default model is created at the construction of the component. ButtonModel
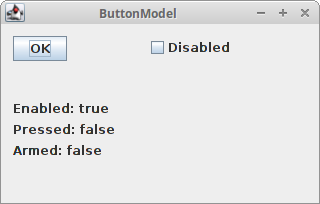
The model is used for various kinds of buttons like push buttons, check boxes, radio boxes and for menu items. The following example illustrates the model for aJButton. We can manage only the state of the button, because no data can be associated with a push button. import java.awt.event.ActionEvent;In our example, we have a button, check box and three labels. The labels represent three properties of the button. Whether it is pressed, disabled or armed.
import java.awt.event.ActionListener;
import javax.swing.DefaultButtonModel;
import javax.swing.JButton;
import javax.swing.JCheckBox;
import javax.swing.JFrame;
import javax.swing.JLabel;
import javax.swing.JPanel;
import javax.swing.event.ChangeEvent;
import javax.swing.event.ChangeListener;
public class ButtonModel extends JFrame {
private JButton ok;
private JLabel enabled;
private JLabel pressed;
private JLabel armed;
public ButtonModel() {
setTitle("ButtonModel");
JPanel panel = new JPanel();
panel.setLayout(null);
ok = new JButton("ok");
JCheckBox cb = new JCheckBox("Enabled", true);
ok.setBounds(40, 30, 80, 25);
ok.addChangeListener(new ChangeListener() {
public void stateChanged(ChangeEvent e) {
DefaultButtonModel model = (DefaultButtonModel) ok.getModel();
if (model.isEnabled())
    enabled.setText("Enabled: true");
else
    enabled.setText("Enabled: false");
if (model.isArmed())
armed.setText("Armed: true");
else
armed.setText("Armed: false");
if (model.isPressed())
pressed.setText("Pressed: true");
else
pressed.setText("Pressed: false");
}
});
cb.addActionListener(new ActionListener() {
public void actionPerformed(ActionEvent e) {
 if (ok.isEnabled())
     ok.setEnabled(false);
 else
     ok.setEnabled(true);
}
});
cb.setBounds(180, 30, 100, 25);
enabled = new JLabel("Enabled: true");
enabled.setBounds(40, 90, 90, 25);
pressed = new JLabel("Pressed: false");
pressed.setBounds(40, 120, 90, 25);
armed = new JLabel("Armed: false");
armed.setBounds(40, 150, 90, 25);
panel.add(ok);
panel.add(cb);
panel.add(enabled);
panel.add(pressed);
panel.add(armed);
add(panel);
setSize(350, 250);
setLocationRelativeTo(null);
setDefaultCloseOperation(EXIT_ON_CLOSE);
setVisible(true);
}
public static void main(String[] args) {
new ButtonModel();
}
}
ok.addChangeListener(new ChangeListener() {
We use a lightweight ChangeListener to listen for button state changes. DefaultButtonModel model = (DefaultButtonModel) ok.getModel();Here we get the default button model.
if (model.isEnabled())We query the model, whether the button is enabled or not. We update the label accordingly.
enabled.setText("Enabled: true");
else
enabled.setText("Enabled: false");
if (ok.isEnabled())The check box enables or disables the button. To enable the ok button, we call the
ok.setEnabled(false);
else
ok.setEnabled(true);
setEnable()method. So we change the state of the button. Where is the model? The answer lies in the AbstractButton.java file. public void setEnabled(boolean b) {
if (!b && model.isRollover()) {
model.setRollover(false);
}
super.setEnabled(b);
model.setEnabled(b);
}
The answer is, that internally, we the Swing toolkit works with a model. The setEnable() is another convenience method for programmers. 
Figure: ButtonModel
Custom ButtonModel
In the previous example, we used a default button model. In the following code example we will use our own button model.import java.awt.event.ActionEvent;This example does the same thing as the previous one. The difference is that we don't use a change listener and we use a custom button model.
import java.awt.event.ActionListener;
import javax.swing.ButtonModel;
import javax.swing.DefaultButtonModel;
import javax.swing.JButton;
import javax.swing.JCheckBox;
import javax.swing.JFrame;
import javax.swing.JLabel;
import javax.swing.JPanel;
public class ButtonModel2 extends JFrame {
private JButton ok;
private JLabel enabled;
private JLabel pressed;
private JLabel armed;
public ButtonModel2() {
setTitle("ButtonModel");
JPanel panel = new JPanel();
panel.setLayout(null);
ok = new JButton("ok");
JCheckBox cb = new JCheckBox("Enabled", true);
ok.setBounds(40, 30, 80, 25);
cb.addActionListener(new ActionListener() {
public void actionPerformed(ActionEvent e) {
if (ok.isEnabled())
ok.setEnabled(false);
else
ok.setEnabled(true);
}
});
cb.setBounds(180, 30, 100, 25);
enabled = new JLabel("Enabled: true");
enabled.setBounds(40, 90, 90, 25);
pressed = new JLabel("Pressed: false");
pressed.setBounds(40, 120, 90, 25);
armed = new JLabel("Armed: false");
armed.setBounds(40, 150, 90, 25);
ButtonModel model = new DefaultButtonModel() {
public void setEnabled(boolean b) {
    if (b)
        enabled.setText("Pressed: true");
    else
        enabled.setText("Pressed: false");

    super.setEnabled(b);
}
public void setArmed(boolean b) {
if (b)
armed.setText("Armed: true");
else
armed.setText("Armed: false");
super.setArmed(b);
}
public void setPressed(boolean b) {
if (b)
pressed.setText("Pressed: true");
else
pressed.setText("Pressed: false");
super.setPressed(b);
}
};
ok.setModel(model);
panel.add(ok);
panel.add(cb);
panel.add(enabled);
panel.add(pressed);
panel.add(armed);
add(panel);
setSize(350, 250);
setLocationRelativeTo(null);
setDefaultCloseOperation(EXIT_ON_CLOSE);
setVisible(true);
}
public static void main(String[] args) {
new ButtonModel2();
}
}
ButtonModel model = new DefaultButtonModel() {
We create a button model and overwrite the necessary methods. public void setEnabled(boolean b) {
if (b)
enabled.setText("Pressed: true");
else
enabled.setText("Pressed: false");
super.setEnabled(b);
}
We overwrite the setEnabled() method and add some functionality there. We must not forget to call the parent method as well to procede with the processing. ok.setModel(model);We set the custom model for the button.
JList models
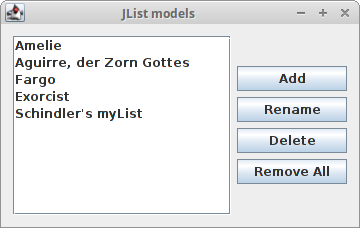
Several components have two models. TheJList component has the following models: ListModel and ListSelectionModel. The ListModel handles data. And the ListSelectionModel works with the GUI. The following example shows both models. import java.awt.BorderLayout;The example shows a list component and four buttons. The buttons control the data in the list component. The example is a bit larger, because we did some additional checks there. We do not allow to input empty spaces into the list component.
import java.awt.Dimension;
import java.awt.event.ActionEvent;
import java.awt.event.ActionListener;
import java.awt.event.MouseAdapter;
import java.awt.event.MouseEvent;
import javax.swing.BorderFactory;
import javax.swing.Box;
import javax.swing.BoxLayout;
import javax.swing.DefaultListModel;
import javax.swing.JButton;
import javax.swing.JFrame;
import javax.swing.JList;
import javax.swing.JOptionPane;
import javax.swing.JPanel;
import javax.swing.JScrollPane;
import javax.swing.ListSelectionModel;
public class List extends JFrame {
private DefaultListModel model;
private JList list;
public List() {
setTitle("JList models");
model = new DefaultListModel();
model.addElement("Amelie");
model.addElement("Aguirre, der Zorn Gottes");
model.addElement("Fargo");
model.addElement("Exorcist");
model.addElement("Schindler list");
JPanel panel = new JPanel();
panel.setLayout(new BoxLayout(panel, BoxLayout.X_AXIS));
JPanel leftPanel = new JPanel();
JPanel rightPanel = new JPanel();
leftPanel.setLayout(new BorderLayout());
rightPanel.setLayout(new BoxLayout(rightPanel, BoxLayout.Y_AXIS));
list = new JList(model);
list.setSelectionMode(ListSelectionModel.SINGLE_SELECTION);
list.setBorder(BorderFactory.createEmptyBorder(2, 2, 2, 2));
list.addMouseListener(new MouseAdapter() {
public void mouseClicked(MouseEvent e) {
if(e.getClickCount() == 2){
int index = list.locationToIndex(e.getPoint());
Object item = model.getElementAt(index);
String text = JOptionPane.showInputDialog("Rename item", item);
String newitem = null;
if (text != null)
newitem = text.trim();
else
return;
if (!newitem.isEmpty()) {
model.remove(index);
model.add(index, newitem);
ListSelectionModel selmodel = list.getSelectionModel();
selmodel.setLeadSelectionIndex(index);
}
}
}
});
JScrollPane pane = new JScrollPane();
pane.getViewport().add(list);
leftPanel.setBorder(BorderFactory.createEmptyBorder(20, 20, 20, 20));
leftPanel.add(pane);
JButton removeall = new JButton("Remove All");
JButton add = new JButton("Add");
add.setMaximumSize(removeall.getMaximumSize());
JButton rename = new JButton("Rename");
rename.setMaximumSize(removeall.getMaximumSize());
JButton delete = new JButton("Delete");
delete.setMaximumSize(removeall.getMaximumSize());
add.addActionListener(new ActionListener() {
public void actionPerformed(ActionEvent e) {
String text = JOptionPane.showInputDialog("Add a new item");
String item = null;
if (text != null)
    item = text.trim();
else
    return;

if (!item.isEmpty())
    model.addElement(item);
}
});
delete.addActionListener(new ActionListener() {
public void actionPerformed(ActionEvent event) {
ListSelectionModel selmodel = list.getSelectionModel();
int index = selmodel.getMinSelectionIndex();
if (index >= 0)
    model.remove(index);
}
});
rename.addActionListener(new ActionListener() {
public void actionPerformed(ActionEvent e) {
ListSelectionModel selmodel = list.getSelectionModel();
int index = selmodel.getMinSelectionIndex();
if (index == -1) return;
Object item = model.getElementAt(index);
String text = JOptionPane.showInputDialog("Rename item", item);
String newitem = null;
if (text != null) {
newitem = text.trim();
} else
return;
if (!newitem.isEmpty()) {
model.remove(index);
model.add(index, newitem);
}
}
});
removeall.addActionListener(new ActionListener() {
public void actionPerformed(ActionEvent e) {
model.clear();
}
});
rightPanel.add(add);
rightPanel.add(Box.createRigidArea(new Dimension(0,4)));
rightPanel.add(rename);
rightPanel.add(Box.createRigidArea(new Dimension(0,4)));
rightPanel.add(delete);
rightPanel.add(Box.createRigidArea(new Dimension(0,4)));
rightPanel.add(removeall);
rightPanel.setBorder(BorderFactory.createEmptyBorder(0, 0, 0, 20));
panel.add(leftPanel);
panel.add(rightPanel);
add(panel);
setSize(350, 250);
setLocationRelativeTo(null);
setDefaultCloseOperation(EXIT_ON_CLOSE);
setVisible(true);
}
public static void main(String[] args) {
new List();
}
}
model = new DefaultListModel();We create a list model and add elements into it.
model.addElement("Amelie");
model.addElement("Aguirre, der Zorn Gottes");
...
list = new JList(model);We create a list component. The parameter of the constructor is the model, we have created. We put the list into the single selection mode. We also put some space around the list.
list.setSelectionMode(ListSelectionModel.SINGLE_SELECTION);
list.setBorder(BorderFactory.createEmptyBorder(2, 2, 2, 2));
if (text != null)We add only items that are not equal to null and are not empty. e.g. that contain at least one character other than white space. It makes no sense to add white spaces or null values into the list.
item = text.trim();
else
return;
if (!item.isEmpty())
model.addElement(item);
ListSelectionModel selmodel = list.getSelectionModel();This is the code, that runs when we press the delete button. In order to delete an item from the list, it must be selected. So we must figure out the currently selected item. For this, we call the
int index = selmodel.getMinSelectionIndex();
if (index >= 0)
model.remove(index);
getSelectionModel() method. This is a GUI work, so we use a ListSelectionModel. Removing an item is working with data. For that we use the list data model. So, in our example we used both list models. We called add(), remove() and clear() methods of the list data model to work with our data. And we used a list selection model in order to find out the selected item, which is a GUI job.

Figure: List Models
A document model
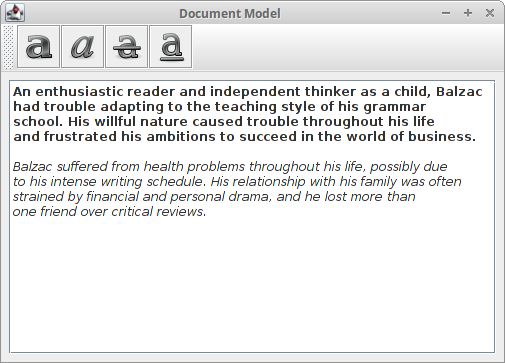
This is an excellent example of a separation of a data from the visual representation. In aJTextPane component, we have a StyledDocument for setting the style of the text data. import java.awt.BorderLayout;The example has a text pane and a toolbar. In the toolbar, we have four buttons, that change attributes of the text.
import java.awt.Dimension;
import java.awt.event.ActionEvent;
import java.awt.event.ActionListener;
import javax.swing.BorderFactory;
import javax.swing.ImageIcon;
import javax.swing.JButton;
import javax.swing.JFrame;
import javax.swing.JPanel;
import javax.swing.JScrollPane;
import javax.swing.JTextPane;
import javax.swing.JToolBar;
import javax.swing.text.Style;
import javax.swing.text.StyleConstants;
import javax.swing.text.StyledDocument;
public class DocumentModel extends JFrame {
private StyledDocument doc;
private JTextPane textpane;
public DocumentModel() {
setTitle("Document Model");
JToolBar toolbar = new JToolBar();
ImageIcon bold = new ImageIcon("bold.png");
ImageIcon italic = new ImageIcon("italic.png");
ImageIcon strike = new ImageIcon("strike.png");
ImageIcon underline = new ImageIcon("underline.png");
JButton boldb = new JButton(bold);
JButton italb = new JButton(italic);
JButton strib = new JButton(strike);
JButton undeb = new JButton(underline);
toolbar.add(boldb);
toolbar.add(italb);
toolbar.add(strib);
toolbar.add(undeb);
add(toolbar, BorderLayout.NORTH);
JPanel panel = new JPanel();
panel.setLayout(new BorderLayout());
panel.setBorder(BorderFactory.createEmptyBorder(20, 20, 20, 20));
JScrollPane pane = new JScrollPane();
textpane = new JTextPane();
textpane.setBorder(BorderFactory.createEmptyBorder(8, 8, 8, 8));
doc = textpane.getStyledDocument();
Style style = textpane.addStyle("Bold", null);
StyleConstants.setBold(style, true);
style = textpane.addStyle("Italic", null);
StyleConstants.setItalic(style, true);
style = textpane.addStyle("Underline", null);
StyleConstants.setUnderline(style, true);
style = textpane.addStyle("Strike", null);
StyleConstants.setStrikeThrough(style, true);
boldb.addActionListener(new ActionListener() {
public void actionPerformed(ActionEvent e) {
doc.setCharacterAttributes(textpane.getSelectionStart(),
    textpane.getSelectionEnd() - textpane.getSelectionStart(),
    textpane.getStyle("Bold"), false);
}
});
italb.addActionListener(new ActionListener() {
public void actionPerformed(ActionEvent e) {
doc.setCharacterAttributes(textpane.getSelectionStart(),
textpane.getSelectionEnd() - textpane.getSelectionStart(),
textpane.getStyle("Italic"), false);
}
});
strib.addActionListener(new ActionListener() {
public void actionPerformed(ActionEvent e) {
doc.setCharacterAttributes(textpane.getSelectionStart(),
textpane.getSelectionEnd() - textpane.getSelectionStart(),
textpane.getStyle("Strike"), false);
}
});
undeb.addActionListener(new ActionListener() {
public void actionPerformed(ActionEvent e) {
doc.setCharacterAttributes(textpane.getSelectionStart(),
textpane.getSelectionEnd() - textpane.getSelectionStart(),
textpane.getStyle("Underline"), false);
}
});
pane.getViewport().add(textpane);
panel.add(pane);
add(panel);
setSize(new Dimension(380, 320));
setLocationRelativeTo(null);
setDefaultCloseOperation(EXIT_ON_CLOSE);
setVisible(true);
}
public static void main(String[] args) {
new DocumentModel();
}
}
doc = textpane.getStyledDocument();Here we get the styled document, which is a model for the text pane component.
Style style = textpane.addStyle("Bold", null);
StyleConstants.setBold(style, true);
A style is a set of text attributes, such as color, size. Here we register a bold style for the text pane component. The registered styles can be retrieved at any time. doc.setCharacterAttributes(textpane.getSelectionStart(),Here we change the attributes of the text. The parameters are the offset, length of the selection, the style and the boolean value replace. The offset is the beginning of the text, where we apply the bold text. We get the length value by substracting the selection end and selection start values. Boolean value false means, we are not replacing an old style with a new one, but we merge them. This means, if the text is underlined and we make it bold, the result is an underlined bold text.
textpane.getSelectionEnd() - textpane.getSelectionStart(),
textpane.getStyle("Bold"), false);

Figure: Document model
In this chapter, we have mentioned Swing models.
No comments:
Post a Comment