Continue Drawing with Cairo library
In this part of the Java Gnome programming tutorial, we will continue drawing with the Cairo library.Donut
In the following example we create a complex shape by rotating a bunch of ellipses.donut.java
package com.zetcode;In this example, we create a donut. The shape resembles a cookie, hence the name donut.
import org.freedesktop.cairo.Context;
import org.freedesktop.cairo.Matrix;
import org.gnome.gdk.Event;
import org.gnome.gdk.EventExpose;
import org.gnome.gtk.DrawingArea;
import org.gnome.gtk.Gtk;
import org.gnome.gtk.Widget;
import org.gnome.gtk.Window;
import org.gnome.gtk.WindowPosition;
/**
* ZetCode Java Gnome tutorial
*
* This program draws a Donut
* shape on the drawing area.
*
* @author jan bodnar
* website zetcode.com
* last modified March 2009
*/
public class GDonut extends Window
implements Widget.ExposeEvent {
public GDonut() {
setTitle("Donut");
initUI();
connect(new Window.DeleteEvent() {
public boolean onDeleteEvent(Widget source, Event event) {
Gtk.mainQuit();
return false;
}
});
setDefaultSize(300, 260);
setPosition(WindowPosition.CENTER);
showAll();
}
public void initUI() {
DrawingArea darea = new DrawingArea();
darea.connect(this);
add(darea);
}
public boolean onExposeEvent(Widget widget, EventExpose eventExpose) {
final Context cr;
cr = new Context(widget.getWindow());
drawDonut(cr);
return false;
}
public void drawDonut(Context cr) {
int width = this.getWindow().getWidth();
int height = this.getWindow().getHeight();
cr.setLineWidth(0.5);
 cr.translate(width/2, height/2);
 cr.arc( 0, 0, 120, 0, 2 * Math.PI);
 cr.stroke();
cr.save();
for ( int i = 0; i < 36; i++) {
 Matrix mat = new Matrix();
 mat.rotate(i*Math.PI/36);
 mat.scale(0.3, 1);
 cr.transform(mat);
 cr.arc(0, 0, 120, 0, 2 * Math.PI);
 cr.restore();
 cr.stroke();
 cr.save();
}
}
public static void main(String[] args) {
Gtk.init(args);
new GDonut();
Gtk.main();
}
}
cr.translate(width/2, height/2);In the beginning there is an ellipse.
cr.arc( 0, 0, 120, 0, 2 * Math.PI);
cr.stroke();
Matrix mat = new Matrix();After several rotations, there is a donut.
mat.rotate(i*Math.PI/36);
mat.scale(0.3, 1);
cr.transform(mat);
cr.arc(0, 0, 120, 0, 2 * Math.PI);
cr.restore();
cr.stroke();
cr.save();
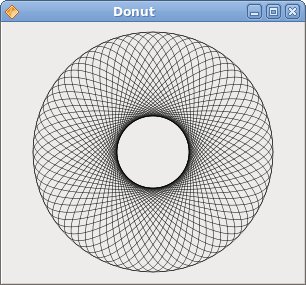
Figure: Donut
Gradients
In computer graphics, gradient is a smooth blending of shades from light to dark or from one color to another. In 2D drawing programs and paint programs, gradients are used to create colorful backgrounds and special effects as well as to simulate lights and shadows. (answers.com)gradients.java
package com.zetcode;In our example, we draw three rectangles with three different gradients.
import org.freedesktop.cairo.Context;
import org.freedesktop.cairo.LinearPattern;
import org.gnome.gdk.Color;
import org.gnome.gdk.EventExpose;
import org.gnome.gtk.DrawingArea;
import org.gnome.gtk.Gtk;
import org.gnome.gtk.Widget;
import org.gnome.gtk.Window;
import org.gnome.gtk.WindowPosition;
/**
* ZetCode Java Gnome tutorial
*
* This program draws gradients.
*
* @author jan bodnar
* website zetcode.com
* last modified March 2009
*/
public class GGradients extends Window implements Widget.ExposeEvent {
public GGradients() {
setTitle("Gradients");
initUI();
connect(new Window.DeleteEvent() {
public boolean onDeleteEvent(Widget source, Event event) {
Gtk.mainQuit();
return false;
}
});
setDefaultSize(340, 390);
setPosition(WindowPosition.CENTER);
showAll();
}
public void initUI() {
DrawingArea darea = new DrawingArea();
darea.connect(this);
add(darea);
}
public boolean onExposeEvent(Widget widget, EventExpose eventExpose) {
final Context cr;
cr = new Context(widget.getWindow());
drawGradients(cr);
return false;
}
public void drawGradients(Context cr) {
LinearPattern lg1 = new LinearPattern(0.0, 0.0, 350.0, 350.0);
int count = 1;
for (double j=0.1; j<1.0; j+= 0.1) {
if (count % 2 != 0) {
lg1.addColorStopRGB(j, 0, 0, 0);
} else {
lg1.addColorStopRGB(j, 1, 0, 0);
}
count++;
}
cr.rectangle(20, 20, 300, 100);
cr.setSource(lg1);
cr.fill();
LinearPattern lg2 = new LinearPattern(0.0, 0.0, 350.0, 0);
count = 1;
for (double i=0.05; i<0.95; i+= 0.025) {
if (count % 2 != 0) {
lg2.addColorStopRGB(i, 0, 0, 0);
} else {
lg2.addColorStopRGB(i, 0, 0, 1);
}
count++;
}
cr.rectangle(20, 140, 300, 100);
cr.setSource(lg2);
cr.fill();
 LinearPattern lg3 = new LinearPattern(20.0, 260.0,  20.0, 360.0);
 lg3.addColorStopRGB(0.1, 0, 0, 0 );
 lg3.addColorStopRGB(0.5, 1, 1, 0);
 lg3.addColorStopRGB(0.9, 0, 0, 0 );
cr.rectangle(20, 260, 300, 100);
cr.setSource(lg3);
cr.fill();
}
public static void main(String[] args) {
Gtk.init(args);
new GGradients();
Gtk.main();
}
}
LinearPattern lg1 = new LinearPattern(0.0, 0.0, 350.0, 350.0);Here we create a linear gradient pattern. The parameters specify the line, along which we draw the gradient. In our case it is a diagonal line.
LinearPattern lg3 = new LinearPattern(20.0, 260.0, 20.0, 360.0);We define color stops to produce our gradient pattern. In this case, the gradient is a blending of black and yellow colors. By adding two black and one yellow stops, we create a horizontal gradient pattern. What do these stops actually mean? In our case, we begin with black color, which will stop at 1/10 of the size. Then we begin to gradually paint in yellow, which will culminate at the centre of the shape. The yellow color stops at 9/10 of the size, where we begin painting in black again, until the end.
lg3.addColorStopRGB(0.1, 0, 0, 0 );
lg3.addColorStopRGB(0.5, 1, 1, 0);
lg3.addColorStopRGB(0.9, 0, 0, 0 );
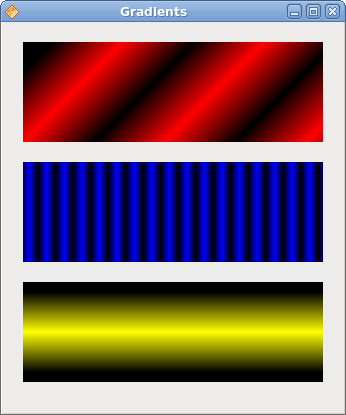
Figure: Gradients
Star
In the following example, we create a moving star. The star moves, rotates and grows/shrinks.star.java
package com.zetcode;We apply translate, scale and rotate operations on a star shape.
import java.util.Timer;
import java.util.TimerTask;
import org.freedesktop.cairo.Context;
import org.freedesktop.cairo.Matrix;
import org.gnome.gdk.Event;
import org.gnome.gdk.EventExpose;
import org.gnome.gtk.DrawingArea;
import org.gnome.gtk.Gtk;
import org.gnome.gtk.Widget;
import org.gnome.gtk.Window;
import org.gnome.gtk.WindowPosition;
/**
* ZetCode Java Gnome tutorial
*
* This program shows an animated star. Rotate,
* translate and scale operations are
* applied on the star.
*
* @author jan bodnar
* website zetcode.com
* last modified March 2009
*/
public class GStar extends Window
implements Widget.ExposeEvent {
private static Timer timer;
private int count;
private double angle = 0;
private double scale = 1;
private double delta = 0.01;
double points[][] = {
{ 0, 85 }, { 75, 75 }, { 100, 10 }, { 125, 75 },
{ 200, 85 }, { 150, 125 }, { 160, 190 }, { 100, 150 },
{ 40, 190 }, { 50, 125 }, { 0, 85 }
};
public GStar() {
setTitle("Star");
timer = new Timer();
timer.scheduleAtFixedRate(new ScheduleTask(), 100, 20);
count = 0;
initUI();
connect(new Window.DeleteEvent() {
 public boolean onDeleteEvent(Widget source, Event event) {
     timer.cancel();
     Gtk.mainQuit();
     return false;
 }
});
setSizeRequest(350, 250);
setPosition(WindowPosition.CENTER);
showAll();
}
public void initUI() {
DrawingArea darea = new DrawingArea();
darea.connect(this);
add(darea);
}
public void drawStar(Context cr) {
int width = this.getWindow().getWidth();
int height = this.getWindow().getHeight();
cr.setSource(0, 0.44, 0.7);
cr.setLineWidth(1);
 Matrix mat = new Matrix();

 mat.translate(width/2, height/2);
 mat.rotate(angle);
 mat.scale(scale, scale);
 cr.transform(mat);
 for ( int i = 0; i < 10; i++ ) {
     cr.lineTo(points[i][0], points[i][1]);
 }
cr.fill();
cr.stroke();
if ( scale < 0.01 ) {
delta = -delta;
} else if (scale > 0.99) {
delta = -delta;
}
scale += delta;
angle += 0.01;
}
public boolean onExposeEvent(Widget widget, EventExpose eventExpose) {
Context cr = new Context(widget.getWindow());
drawStar(cr);
return false;
}
class ScheduleTask extends TimerTask {
public void run() {
count++;
queueDraw();
}
}
public static void main(String[] args) {
Gtk.init(args);
new GStar();
Gtk.main();
}
}
public boolean onDeleteEvent(Widget source, Event event) {
timer.cancel();
Gtk.mainQuit();
return false;
}
For a clean exit, we must not forget to stop the timer. Timer is and object of the java util library and is not stopped by the Gtk.mainQuit() method. double points[][] = {
{ 0, 85 }, { 75, 75 }, { 100, 10 }, { 125, 75 },
{ 200, 85 }, { 150, 125 }, { 160, 190 }, { 100, 150 },
{ 40, 190 }, { 50, 125 }, { 0, 85 }
};
These points are used to build the star shape. Matrix mat = new Matrix();Here we apply the translate, rotate and scale operations on the star shape.
mat.translate(width/2, height/2);
mat.rotate(angle);
mat.scale(scale, scale);
cr.transform(mat);
for ( int i = 0; i < 10; i++ ) {
cr.lineTo(points[i][0], points[i][1]);
}
Here we draw the star. Waiting
In this examle, we use transparency effect to create a waiting demo. We will draw 8 lines that will gradually fade out creating an illusion, that a line is moving. Such effects are often used to inform users, that a lengthy task is going on behind the scenes. An example is streaming video over the internet.waiting.java
package com.zetcode;We draw eight lines with eight different alpha values.
import java.util.Timer;
import java.util.TimerTask;
import org.freedesktop.cairo.Context;
import org.gnome.gdk.Event;
import org.gnome.gdk.EventExpose;
import org.gnome.gtk.DrawingArea;
import org.gnome.gtk.Gtk;
import org.gnome.gtk.Widget;
import org.gnome.gtk.Window;
import org.gnome.gtk.WindowPosition;
/**
* ZetCode Java Gnome tutorial
*
* This program creates a waiting
* effect.
*
* @author jan bodnar
* website zetcode.com
* last modified March 2009
*/
public class GWaiting extends Window
implements Widget.ExposeEvent {
private static Timer timer;
private int count;
private final double[][] trs = {
{ 0.0, 0.15, 0.30, 0.5, 0.65, 0.80, 0.9, 1.0 },
{ 1.0, 0.0, 0.15, 0.30, 0.5, 0.65, 0.8, 0.9 },
{ 0.9, 1.0, 0.0, 0.15, 0.3, 0.5, 0.65, 0.8 },
{ 0.8, 0.9, 1.0, 0.0, 0.15, 0.3, 0.5, 0.65 },
{ 0.65, 0.8, 0.9, 1.0, 0.0, 0.15, 0.3, 0.5 },
{ 0.5, 0.65, 0.8, 0.9, 1.0, 0.0, 0.15, 0.3 },
{ 0.3, 0.5, 0.65, 0.8, 0.9, 1.0, 0.0, 0.15 },
{ 0.15, 0.3, 0.5, 0.65, 0.8, 0.9, 1.0, 0.0, }
};
public GWaiting() {
setPosition(WindowPosition.CENTER);
timer = new Timer();
timer.scheduleAtFixedRate(new ScheduleTask(), 100, 80);
count = 0;
initUI();
connect(new Window.DeleteEvent() {
public boolean onDeleteEvent(Widget source, Event event) {
timer.cancel();
Gtk.mainQuit();
return false;
}
});
resize(250, 150);
setTitle("Waiting");
showAll();
}
public void initUI() {
DrawingArea darea = new DrawingArea();
add(darea);
darea.connect(this);
}
public boolean onExposeEvent(Widget widget, EventExpose eventExpose) {
Context cr = new Context(widget.getWindow());
drawWaiting(cr);
return false;
}
private void drawWaiting(Context cr) {
int w = this.getWidth();
int h = this.getHeight();
cr.translate(w/2, h/2);
for (int i = 0; i < 8; i++) {
cr.setLineWidth(3);
cr.setSource(0, 0, 0, trs[count%8][i]);
cr.moveTo(0, -10);
cr.lineTo(0, -40);
cr.rotate(Math.PI/4f);
cr.stroke();
}
}
class ScheduleTask extends TimerTask {
public void run() {
count++;
queueDraw();
}
}
public static void main(String[] args) {
Gtk.init(args);
new GWaiting();
Gtk.main();
}
}
 private final double[][] trs = {
     { 0.0, 0.15, 0.30, 0.5, 0.65, 0.80, 0.9, 1.0 },
     ....
 };
This is a two dimensional array of transparency values used in this demo. There are 8 rows, each for one state. Each of the 8 lines will continuosly use these values. cr.setLineWidth(3);We make the lines a bit thicker, so that they are better visible.
cr.setSource(0, 0, 0, trs[count%8][i]);Here we define the transparency value for a line.
cr.moveTo(0, -10);These code lines will draw each of the eight lines.
cr.lineTo(0, -40);
cr.rotate(Math.PI/4f);
cr.stroke();
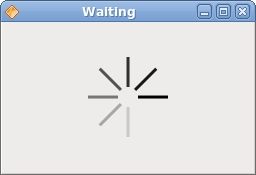
Figure: Waiting
In this chapter of the Java Gnome programming library, we did some more advanced drawing with the Cairo library.
No comments:
Post a Comment