Advanced widgets in Java Gnome
In this part of the Java Gnome programming tutorial, we will introduce some more advanced widgets.TextView
TexView widget is used for displaying and editing multiline text. TexView widget has also the MVC design. The TextView represents the view component and TexBuffer represents the model component. The TexBuffer is used to manipulate the text data. TextTag is an attribute that can be applied to the text. The TextIter represents a position between two characters in the text. All manipulation with the text is done using text iterators.textview.java
package com.zetcode;The example shows some text with different TextTags applied.
import org.gnome.gdk.Event;
import org.gnome.gtk.Gtk;
import org.gnome.gtk.TextBuffer;
import org.gnome.gtk.TextIter;
import org.gnome.gtk.TextTag;
import org.gnome.gtk.TextView;
import org.gnome.gtk.Widget;
import org.gnome.gtk.Window;
import org.gnome.gtk.WindowPosition;
import org.gnome.gtk.WrapMode;
import org.gnome.pango.FontDescription;
import org.gnome.pango.Style;
/**
* ZetCode Java Gnome tutorial
*
* This program demonstrates the
* TextView widget.
*
* @author jan bodnar
* website zetcode.com
* last modified March 2009
*/
public class GTextView extends Window {
public GTextView() {
setTitle("TextView");
initUI();
connect(new Window.DeleteEvent() {
public boolean onDeleteEvent(Widget source, Event event) {
Gtk.mainQuit();
return false;
}
});
setDefaultSize(250, 200);
setPosition(WindowPosition.CENTER);
showAll();
}
public void initUI() {
final TextView view;
final FontDescription desc;
final TextBuffer buffer;
final TextTag colorText, italics, background, mleft;
TextIter pointer;
view = new TextView();
 desc = new FontDescription("Sans, 10");
 view.modifyFont(desc);
buffer = new TextBuffer();
 colorText = new TextTag();
 colorText.setForeground("blue");
italics = new TextTag();
italics.setStyle(Style.ITALIC);
background = new TextTag();
background.setBackground("lightgray");
mleft = new TextTag();
mleft.setLeftMargin(8);
pointer = buffer.getIterStart();
buffer.insert(pointer, "Plain text \n");
buffer.insert(pointer, "Colored text\n", new TextTag[] {colorText, mleft});
buffer.insert(pointer, "Text with colored background\n", background);
buffer.insert(pointer, "Text in italics", italics);
view.setBuffer(buffer);
view.setPaddingAboveParagraph(5);
add(view);
}
public static void main(String[] args) {
Gtk.init(args);
new GTextView();
Gtk.main();
}
}
view = new TextView();TextView widget is created.
desc = new FontDescription("Sans, 10");
view.modifyFont(desc);
We set the font for the TextView to be Sans 10. colorText = new TextTag();A TextTag widget is created. This tag will set the color of the text to blue, if applied.
colorText.setForeground("blue");
buffer.insert(pointer, "Text in italics", italics);Here we apply an italics text tag for the specified text.
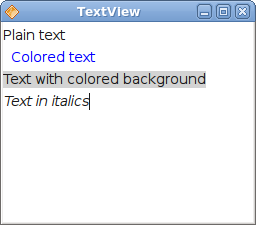
Figure: TextView
ListView
In the following example, we use the TreeView widget in a list view mode. The ListStore is used to store data.listview.java
package com.zetcode;In our example, we show a list of six actresses in the TreeViewwidget. Each of the rows shows the name, the place of born and the year of born for each of them.
import org.gnome.gdk.Event;
import org.gnome.gtk.CellRendererText;
import org.gnome.gtk.DataColumn;
import org.gnome.gtk.DataColumnString;
import org.gnome.gtk.Gtk;
import org.gnome.gtk.ListStore;
import org.gnome.gtk.Statusbar;
import org.gnome.gtk.TreeIter;
import org.gnome.gtk.TreePath;
import org.gnome.gtk.TreeView;
import org.gnome.gtk.TreeViewColumn;
import org.gnome.gtk.VBox;
import org.gnome.gtk.Widget;
import org.gnome.gtk.Window;
import org.gnome.gtk.WindowPosition;
/**
* ZetCode Java Gnome tutorial
*
* This program demonstrates the
* TreeView widget in listview mode.
*
* @author jan bodnar
* website zetcode.com
* last modified March 2009
*/
public class GListView extends Window {
private Actress[] actresses =
{
new Actress("Jessica Alba", "Pomona", 1981),
new Actress("Sigourney Weaver", "New York", 1949),
new Actress("Angelina Jolie", "Los Angeles", 1975),
new Actress("Natalie Portman", "Jerusalem", 1981),
new Actress("Rachel Weissz", "London", 1971),
new Actress("Scarlett Johansson", "New York", 1984)
};
private Statusbar statusbar;
public GListView() {
setTitle("ListView");
initUI();
connect(new Window.DeleteEvent() {
public boolean onDeleteEvent(Widget source, Event event) {
Gtk.mainQuit();
return false;
}
});
setDefaultSize(350, 300);
setPosition(WindowPosition.CENTER);
showAll();
}
public void initUI() {
final TreeView view;
final ListStore model;
TreeIter row;
CellRendererText renderer;
TreeViewColumn column;
final DataColumnString nameCol;
final DataColumnString placeCol;
final DataColumnString yearCol;
statusbar = new Statusbar();
model = new ListStore(new DataColumn[] {
nameCol = new DataColumnString(),
placeCol = new DataColumnString(),
yearCol = new DataColumnString(),
});
for (Actress act : actresses) {
row = model.appendRow();
model.setValue(row, nameCol, act.name);
model.setValue(row, placeCol, act.place);
model.setValue(row, yearCol, String.valueOf(act.year));
}
view = new TreeView(model);
column = view.appendColumn();
column.setTitle("Name");
renderer = new CellRendererText(column);
renderer.setText(nameCol);
column = view.appendColumn();
column.setTitle("Place");
renderer = new CellRendererText(column);
renderer.setText(placeCol);
column = view.appendColumn();
column.setTitle("Year");
renderer = new CellRendererText(column);
renderer.setText(yearCol);
view.connect(new TreeView.RowActivated() {
public void onRowActivated(TreeView treeView,
TreePath treePath,
TreeViewColumn treeViewColumn) {
final TreeIter row;
final String place;
final String name;
final String year;
final String text;
row = model.getIter(treePath);
place = model.getValue(row, placeCol);
name = model.getValue(row, nameCol);
year = model.getValue(row, yearCol);
text = name + ", " + place + ", " + year;
statusbar.setMessage(text);
}
});
VBox vbox = new VBox(false, 0);
vbox.packStart(view);
vbox.packStart(statusbar, false, false, 0);
add(vbox);
}
class Actress {
public String name;
public String place;
public int year;
Actress(String name, String place, int year) {
this.name = name;
this.place = place;
this.year = year;
}
}
public static void main(String[] args) {
Gtk.init(args);
new GListView();
Gtk.main();
}
}
    class Actress {
       public String name;
       public String place;
       public int year;
       ...
    }
The Actress class is used for storing data about an actress. model = new ListStore(new DataColumn[] {
nameCol = new DataColumnString(),
placeCol = new DataColumnString(),
yearCol = new DataColumnString(),
});
These lines declare the model to have three string data columns. for (Actress act : actresses) {
row = model.appendRow();
model.setValue(row, nameCol, act.name);
model.setValue(row, placeCol, act.place);
model.setValue(row, yearCol, String.valueOf(act.year));
}
The model is filled with data from the array of actresses. column = view.appendColumn();A new column is created with "Name" title. Each column has a cell renderer. The cell renderer is responsible for displaying data. In our case we have the most common cell renderer, the CellRendererText. As the name suggests, it shows textual data in a TreeViewColumn.
column.setTitle("Name");
renderer = new CellRendererText(column);
renderer.setText(nameCol);
row = model.getIter(treePath);If we double click on an item, we display the whole row in the statusbar.
place = model.getValue(row, placeCol);
name = model.getValue(row, nameCol);
year = model.getValue(row, yearCol);
text = name + ", " + place + ", " + year;
statusbar.setMessage(text);
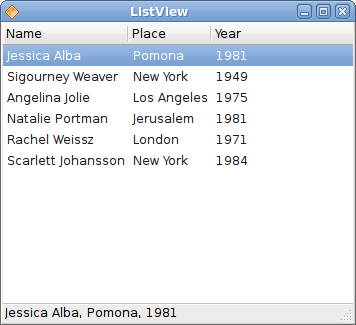
Figure: ListView
Tree
In the last example of this chapter, we use the TreeViewwidget to show a hierarchical tree of data.tree.java
package com.zetcode;This time we use the TreeView widget to show hierarchical data.
import org.gnome.gdk.Event;
import org.gnome.gtk.CellRendererText;
import org.gnome.gtk.DataColumn;
import org.gnome.gtk.DataColumnString;
import org.gnome.gtk.Gtk;
import org.gnome.gtk.Statusbar;
import org.gnome.gtk.TreeIter;
import org.gnome.gtk.TreePath;
import org.gnome.gtk.TreeStore;
import org.gnome.gtk.TreeView;
import org.gnome.gtk.TreeViewColumn;
import org.gnome.gtk.VBox;
import org.gnome.gtk.Widget;
import org.gnome.gtk.Window;
import org.gnome.gtk.WindowPosition;
/**
* ZetCode Java Gnome tutorial
*
* This program demonstrates the
* TreeView widget in tree view mode.
*
* @author jan bodnar
* website zetcode.com
* last modified March 2009
*/
public class GTree extends Window {
private DataColumnString dataCol;
private TreeStore model;
private TreeIter row;
private TreeView view;
private TreeIter rowChild;
private TreeViewColumn column;
private CellRendererText renderer;
private Statusbar statusbar;
public GTree() {
setTitle("GTree");
initUI();
connect(new Window.DeleteEvent() {
public boolean onDeleteEvent(Widget source, Event event) {
Gtk.mainQuit();
return false;
}
});
setDefaultSize(350, 300);
setPosition(WindowPosition.CENTER);
showAll();
}
public void initUI() {
statusbar = new Statusbar();
 model = new TreeStore(new DataColumn[] {
         dataCol = new DataColumnString(),
 });
row = model.appendRow();
model.setValue(row, dataCol, "Scripting languages");
 rowChild = model.appendChild( row );
 model.setValue(rowChild, dataCol, "PHP");
rowChild = model.appendChild( row );
model.setValue(rowChild, dataCol, "Python");
rowChild = model.appendChild( row );
model.setValue(rowChild, dataCol, "PERL");
rowChild = model.appendChild( row );
model.setValue(rowChild, dataCol, "Ruby");
row = model.appendRow();
model.setValue(row, dataCol, "Compiling languages");
rowChild = model.appendChild( row );
model.setValue( rowChild, dataCol, "Java");
rowChild = model.appendChild( row );
model.setValue( rowChild, dataCol, "C++");
rowChild = model.appendChild( row );
model.setValue( rowChild, dataCol, "C#");
rowChild = model.appendChild( row );
model.setValue( rowChild, dataCol, "C");
view = new TreeView(model);
 column = view.appendColumn();
 column.setTitle("Programming Languages");
 renderer = new CellRendererText(column);
 renderer.setText(dataCol);
view.connect(new TreeView.RowActivated() {
public void onRowActivated(TreeView treeView,
TreePath treePath,
TreeViewColumn treeViewColumn) {
final TreeIter row;
final String text;
 row = model.getIter(treePath);
 text = model.getValue(row, dataCol);

 statusbar.setMessage(text);
}
});
VBox vbox = new VBox(false, 0);
vbox.packStart(view);
vbox.packStart(statusbar, false, false, 0);
add(vbox);
}
public static void main(String[] args) {
Gtk.init(args);
new GTree();
Gtk.main();
}
}
model = new TreeStore(new DataColumn[] {
dataCol = new DataColumnString(),
});
Here we declare the TreeStore to have one string data column. model.setValue(row, dataCol, "Scripting languages");We append a top level node.
rowChild = model.appendChild( row );We append a child row for the top level node.
model.setValue(rowChild, dataCol, "PHP");
view = new TreeView(model);We create the instance of the TreeView widget.
column = view.appendColumn();We create the column and the cell renderer.
column.setTitle("Programming Languages");
renderer = new CellRendererText(column);
renderer.setText(dataCol);
row = model.getIter(treePath);Upon double click, we show the selected node in the statusbar.
text = model.getValue(row, dataCol);
statusbar.setMessage(text);
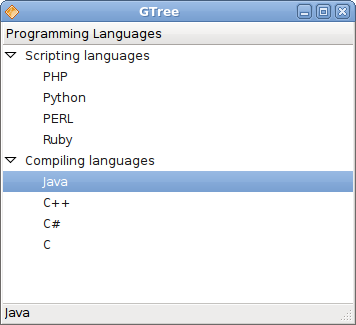
Figure: Tree
In this chapter, we were talking about advanced Java Gnome widgets.
No comments:
Post a Comment