Custom widget in QtJambi
In this part of the QtJambi programming tutorial, we will create a custom widget.Toolkits usually provide only the most common widgets like buttons, text widgets, sliders etc. No toolkit can provide all possible widgets. Programmers must create such widgets by themselves. They do it by using the drawing tools provided by the toolkit. There are two possibilities. A programmer can modify or enhance an existing widget. Or he can create a custom widget from scratch.
The Burning widget
In the next example, we will create a custom burning widget. This widget can be seen in applications like Nero or K3B. The widget will be created from scratch.Burning.java
package com.zetcode;In this file, we create the Burning widget.
import com.trolltech.qt.core.QPointF;
import com.trolltech.qt.core.QRectF;
import com.trolltech.qt.gui.QBrush;
import com.trolltech.qt.gui.QColor;
import com.trolltech.qt.gui.QFont;
import com.trolltech.qt.gui.QFontMetrics;
import com.trolltech.qt.gui.QLineF;
import com.trolltech.qt.gui.QPaintEvent;
import com.trolltech.qt.gui.QPainter;
import com.trolltech.qt.gui.QWidget;
public class Burning extends QWidget {
private final int PANEL_HEIGHT = 30;
private final int DISTANCE = 19;
private final int LINE_WIDTH = 5;
private final int DIVISIONS = 10;
private final float FULL_CAPACITY = 700f;
private final float MAX_CAPACITY = 750f;
private final QColor redColor = new QColor(255, 175, 175);
private final QColor yellowColor = new QColor(255, 255, 184);
private QWidget parent;
private String num[] = {
    "75", "150", "225", "300",
    "375", "450", "525", "600",
    "675"
};
public Burning(QWidget parent) {
super(parent);
this.parent = parent;
setMinimumHeight(PANEL_HEIGHT);
}
@Override
protected void paintEvent(QPaintEvent event) {

    QPainter painter = new QPainter(this);

    drawWidget(painter);
    painter.end();
}
protected void drawWidget(QPainter painter) {
JambiApp burn = (JambiApp) parent;
float width = size().width();
float slid_width = burn.getCurrentWidth();
float step = width / DIVISIONS;
float till = (width / MAX_CAPACITY) * slid_width;
float full = (width / MAX_CAPACITY) * FULL_CAPACITY;
if (slid_width > FULL_CAPACITY) {
painter.setPen(yellowColor);
painter.setBrush(yellowColor);
painter.drawRect(new QRectF(0, 0, full, PANEL_HEIGHT));
painter.setPen(redColor);
painter.setBrush(redColor);
painter.drawRect(new QRectF(full+1, 0, till-full, PANEL_HEIGHT));
} else {
if (slid_width > 0) {
painter.setPen(yellowColor);
painter.setBrush(yellowColor);
painter.drawRect(new QRectF(0, 0, till, PANEL_HEIGHT));
}
}
painter.setPen(new QColor(90, 90, 90));
painter.setBrush(QBrush.NoBrush);
painter.drawRect(0, 0, size().width()-1, PANEL_HEIGHT-1);
QFont newFont = font();
newFont.setPointSize(7);
painter.setFont(newFont);
for (int i = 1; i <= num.length; i++) {
painter.drawLine(new QLineF(i*step, 1, i*step, LINE_WIDTH));
QFontMetrics metrics = new QFontMetrics(newFont);
int w = metrics.width(num[i-1]);
painter.drawText(new QPointF(i*step-w/2, DISTANCE), num[i-1]);
}
}
}
public class Burning extends QWidget {
The custom widget is based on the QWidget widget. private final int PANEL_HEIGHT = 30;These are important constants. The PANEL_HEIGHT defines the height for the custom widget. The DISTANCE is the distance of the numbers on the scale from the top of their parent border. The LINE_WIDTH is the vertical line width. The DIVISIONS is the number of parts of the scale. The FULL_CAPACITY is the capacity of the media. After it is reached, overburning happens. This is visualized by a red color. The MAX_CAPACITY is the maximum capacity of a medium.
private final int DISTANCE = 19;
private final int LINE_WIDTH = 5;
private final int DIVISIONS = 10;
private final float FULL_CAPACITY = 700f;
private final float MAX_CAPACITY = 750f;
private String num[] = {
"75", "150", "225", "300",
"375", "450", "525", "600",
"675"
};
We use these numbers to build the scale of the Burning widget. @OverrideThe drawing of the custom widget is delegated to the drawWidget() method.
protected void paintEvent(QPaintEvent event) {
QPainter painter = new QPainter(this);
drawWidget(painter);
painter.end();
}
JambiApp burn = (JambiApp) parent;We retrieve the reference to the parent widget.
float slid_width = burn.getCurrentWidth();We use it to get the currently selected slider value.
float width = size().width();We get the width of the widget. The width of the custom widget is dynamic. It can be resized by a user.
float till = (width / MAX_CAPACITY) * slid_width;We use the width variable to do the transformations. Between the values of the scale and the custom widget's measures. Note that we use floating point values. We get greater precision in drawing.
float full = (width / MAX_CAPACITY) * FULL_CAPACITY;
painter.setPen(redColor);These three lines draw the red rectangle, indicating the overburning.
painter.setBrush(redColor);
painter.drawRect(new QRectF(full+1, 0, till-full, PANEL_HEIGHT));
painter.drawRect(0, 0, size().width()-1, PANEL_HEIGHT-1);This is the perimeter of the widget. The outside rectangle.
painter.drawLine(new QLineF(i*step, 1, i*step, LINE_WIDTH));Here we draw the small vertical lines.
int w = metrics.width(num[i-1]);Here we draw the numbers of the scale. To precisely position the numbers, we must get the width of the string.
painter.drawText(new QPointF(i*step-w/2, 19), num[i-1]);
This is the main file. Here we create the slider widget and use our custom widget.
JambiApp.java
package com.zetcode;

import com.trolltech.qt.core.Qt;
import com.trolltech.qt.gui.QApplication;
import com.trolltech.qt.gui.QFrame;
import com.trolltech.qt.gui.QHBoxLayout;
import com.trolltech.qt.gui.QSlider;
import com.trolltech.qt.gui.QVBoxLayout;
import com.trolltech.qt.gui.QWidget;

/**
 * ZetCode QtJambi tutorial
 *
 * In this program, we create
 * a custom widget
 *
 * @author jan bodnar
 * website zetcode.com
 * last modified March 2009
 */

public class JambiApp extends QFrame {

    private final int MAX_CAPACITY = 750;

    QSlider slider;
    QWidget widget;
    int cur_width;

    public JambiApp() {
        setWindowTitle("The Burning Widget");

        initUI();

        resize(370, 200);
        move(300, 300);
        show();
    }

    private void initUI() {

       slider = new QSlider(Qt.Orientation.Horizontal , this);
       slider.setMaximum(MAX_CAPACITY);
       slider.setGeometry(50, 50, 130, 30);

       slider.valueChanged.connect(this, "valueChanged(int)");

       QVBoxLayout vbox = new QVBoxLayout(this);
       QHBoxLayout hbox = new QHBoxLayout();

       vbox.addStretch(1);

       widget = new Burning(this);
       hbox.addWidget(widget, 0);

       vbox.addLayout(hbox);

       setLayout(vbox);
    }

    public void valueChanged(int val) {
        cur_width = val;
        widget.repaint();
    }

    public int getCurrentWidth() {
      return cur_width;
    }


    public static void main(String[] args) {
        QApplication.initialize(args);
        new JambiApp();
        QApplication.exec();
    }
}
widget = new Burning(this);We create the instance of the Burning widget and add it to the horizontal box.
hbox.addWidget(widget, 0);
public void valueChanged(int val) {
    cur_width = val;
    widget.repaint();
}
When the value of the slider changes, we store it inside the cur_width variable and repaint the custom widget. public int getCurrentWidth() {
return cur_width;
}
This method is called by the custom widget to get the actual slider value. 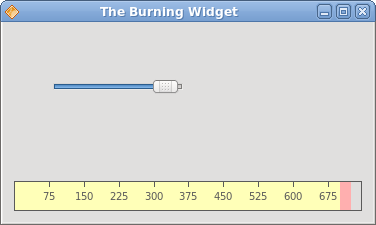
Figure: The Burning widget
In this part of the QtJambi tutorial, we have demonstrated how to create a custom widget.
No comments:
Post a Comment