Painting in QtJambi
In this part of the QtJambi programming tutorial we will do some painting.When do we need to paint? There are situations, when we need to create a widget from scratch. In such a case, we need to do painting. Or we want to create charts, special ornaments, effects or widget enhancements.
The QPainter class is instrumental when we do some painting in the QtJambi library. Paint events are received in the paintEvent() method. To do custom painting, we must reimplement this method.
Patterns
In QtJambi, there are various patterns, that we can use to fill the interiors of shapes.package com.zetcode;In the code example, we will draw nine rectangles and fill them with different brush patterns.
import com.trolltech.qt.core.Qt;
import com.trolltech.qt.gui.QApplication;
import com.trolltech.qt.gui.QPaintEvent;
import com.trolltech.qt.gui.QPainter;
import com.trolltech.qt.gui.QPen;
import com.trolltech.qt.gui.QWidget;
/**
* ZetCode QtJambi tutorial
*
* This program draws nine rectangles.
* The interiors are filled with
* different built-in patterns.
*
* @author jan bodnar
* website zetcode.com
* last modified March 2009
*/
public class JambiApp extends QWidget {
public JambiApp() {
setWindowTitle("Patterns");
resize(350, 280);
move(400, 300);
show();
}
@Override
protected void paintEvent(QPaintEvent event) {

    QPainter painter = new QPainter(this);
    drawPatterns(painter);
}
private void drawPatterns(QPainter painter) {
painter.setPen(QPen.NoPen);
painter.setBrush(Qt.BrushStyle.HorPattern);
painter.drawRect(10, 15, 90, 60);
painter.setBrush(Qt.BrushStyle.VerPattern);
painter.drawRect(130, 15, 90, 60);
painter.setBrush(Qt.BrushStyle.CrossPattern);
painter.drawRect(250, 15, 90, 60);
painter.setBrush(Qt.BrushStyle.Dense7Pattern);
painter.drawRect(10, 105, 90, 60);
painter.setBrush(Qt.BrushStyle.Dense6Pattern);
painter.drawRect(130, 105, 90, 60);
painter.setBrush(Qt.BrushStyle.Dense5Pattern);
painter.drawRect(250, 105, 90, 60);
painter.setBrush(Qt.BrushStyle.BDiagPattern);
painter.drawRect(10, 195, 90, 60);
painter.setBrush(Qt.BrushStyle.FDiagPattern);
painter.drawRect(130, 195, 90, 60);
painter.setBrush(Qt.BrushStyle.DiagCrossPattern);
painter.drawRect(250, 195, 90, 60);
painter.end();
}
public static void main(String[] args) {
QApplication.initialize(args);
new JambiApp();
QApplication.exec();
}
}
@OverrideWhen the window area needs to be redrawn, the paintEvent() method is called. This happens, when we resize the window, maximize it or minimize it etc. Inside this method, we create the QPainter object. This object is used to do all painting in QtJambi. The painting itself is delegated to the drawPatterns() method.
protected void paintEvent(QPaintEvent event) {
QPainter painter = new QPainter(this);
drawPatterns(painter);
}
painter.setPen(QPen.NoPen);The pen object is used to draw outlines of the shapes. In our example we will not use a pen.
painter.setBrush(Qt.BrushStyle.HorPattern);We set a horizontal pattern as a brush.
painter.drawRect(10, 15, 90, 60);We draw a rectangle, with the current pen and brush. The first two parameters of the method are the x, y coordinates. The last two parameters are the width and height of the rectangle.
painter.end();Ends painting. Any resources used while painting are released. According to the documentation, this call is not necessary in QtJambi. The resources are freed by the destructor.
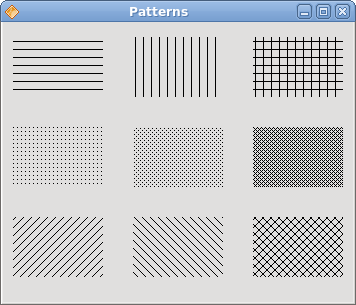
Figure: Patterns
Shapes
The QtJambi painting API can draw various shapes. The following programming code example will show some of them.package com.zetcode;In this code example, we draw nine different shapes on the window. A complex path, a pie, a chord, a rounded rectangle, a polygon, a rectangle, a character based shape, a circle and an ellipse.
import com.trolltech.qt.core.QPoint;
import com.trolltech.qt.core.QPointF;
import com.trolltech.qt.gui.QApplication;
import com.trolltech.qt.gui.QBrush;
import com.trolltech.qt.gui.QColor;
import com.trolltech.qt.gui.QFont;
import com.trolltech.qt.gui.QPaintEvent;
import com.trolltech.qt.gui.QPainter;
import com.trolltech.qt.gui.QPainterPath;
import com.trolltech.qt.gui.QPen;
import com.trolltech.qt.gui.QPolygon;
import com.trolltech.qt.gui.QWidget;
import java.util.ArrayList;
import java.util.List;
/**
* ZetCode QtJambi tutorial
*
* This program draws basic shapes
* available in QtJambi
*
* @author jan bodnar
* website zetcode.com
* last modified March 2009
*/
public class JambiApp extends QWidget {
public JambiApp() {
setWindowTitle("Shapes");
resize(350, 280);
move(400, 300);
show();
}
@Override
protected void paintEvent(QPaintEvent event) {
QPainter painter = new QPainter(this);
drawShapes(painter);
}
private void drawShapes(QPainter painter) {
painter.setRenderHint(QPainter.RenderHint.Antialiasing);
painter.setPen(new QPen(new QBrush(QColor.darkGray), 1));
painter.setBrush(QColor.darkGray);
QPainterPath path1 = new QPainterPath();

path1.moveTo(5, 5);
path1.cubicTo(40, 5,  50, 50,  99, 99);
path1.cubicTo(5, 99,  50, 50,  5, 5);
painter.drawPath(path1);
painter.drawPie(130, 20, 90, 60, 30*16, 120*16);
painter.drawChord(240, 30, 90, 60, 0, 16*180);
painter.drawRoundRect(20, 120, 80, 50);
List<QPoint> points = new ArrayList<QPoint>();
points.add(new QPoint(130, 140));
points.add(new QPoint(180, 170));
points.add(new QPoint(180, 140));
points.add(new QPoint(220, 110));
points.add(new QPoint(140, 100));

QPolygon polygon = new QPolygon(points);

painter.drawPolygon(polygon);
painter.drawRect(250, 110, 60, 60);
QPointF baseline = new QPointF(20, 250);
QFont font = new QFont("Georgia", 55);
QPainterPath path2 = new QPainterPath();
path2.addText(baseline, font, "Q");
painter.drawPath(path2);
painter.drawEllipse(140, 200, 60, 60);
painter.drawEllipse(240, 200, 90, 60);
}
public static void main(String[] args) {
QApplication.initialize(args);
new JambiApp();
QApplication.exec();
}
}
painter.setRenderHint(QPainter.RenderHint.Antialiasing);We use antialiasing in the example. Antialiased shapes look better, but it takes more time to draw them.
painter.setPen(new QPen(new QBrush(QColor.darkGray), 1));We use a dark gray pen and brush to draw the shapes.
painter.setBrush(QColor.darkGray);
QPainterPath path1 = new QPainterPath();The first complex shape is created with the QPainterPath object. The QPainterPath class provides a container for painting operations. A painter path is an object composed of a number of graphical building blocks, such as rectangles, ellipses, lines, and curves.
path1.moveTo(5, 5);
path1.cubicTo(40, 5, 50, 50, 99, 99);
path1.cubicTo(5, 99, 50, 50, 5, 5);
painter.drawPath(path1);
painter.drawPie(130, 20, 90, 60, 30*16, 120*16);These three lines draw a pie, a chord and a rounded rectangle.
painter.drawChord(240, 30, 90, 60, 0, 16*180);
painter.drawRoundRect(20, 120, 80, 50);
List<QPoint> points = new ArrayList<QPoint>();We use a list of five points to create a polygon.
points.add(new QPoint(130, 140));
points.add(new QPoint(180, 170));
points.add(new QPoint(180, 140));
points.add(new QPoint(220, 110));
points.add(new QPoint(140, 100));
QPolygon polygon = new QPolygon(points);
painter.drawPolygon(polygon);
QPointF baseline = new QPointF(20, 250);These lines create a character based shape.
QFont font = new QFont("Georgia", 55);
QPainterPath path2 = new QPainterPath();
path2.addText(baseline, font, "Q");
painter.drawPath(path2);
painter.drawEllipse(140, 200, 60, 60);These two lines create a circle and an ellipse respectively.
painter.drawEllipse(240, 200, 90, 60);
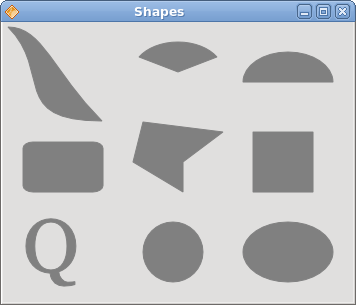
Figure: Shapes
Transparent rectangles
Transparency is the quality of being able to see through a material. The easiest way to understand transparency is to imagine a piece of glass or water. Technically, the rays of light can go through the glass and this way we can see objects behind the glass.In computer graphics, we can achieve transparency effects using alpha compositing. Alpha compositing is the process of combining an image with a background to create the appearance of partial transparency. The composition process uses an alpha channel. (wikipedia.org, answers.com)
package com.zetcode;In the example we will draw ten rectangles with different levels of transparency.
import com.trolltech.qt.gui.QApplication;
import com.trolltech.qt.gui.QColor;
import com.trolltech.qt.gui.QPaintEvent;
import com.trolltech.qt.gui.QPainter;
import com.trolltech.qt.gui.QPen;
import com.trolltech.qt.gui.QWidget;
/**
* ZetCode QtJambi tutorial
*
* This program draws ten
* rectangles with different
* levels of transparency
*
* @author jan bodnar
* website zetcode.com
* last modified March 2009
*/
public class JambiApp extends QWidget {
public JambiApp() {
setWindowTitle("Transparent rectangles");
resize(590, 90);
move(400, 300);
show();
}
@Override
protected void paintEvent(QPaintEvent event) {
QPainter painter = new QPainter(this);
drawRectangles(painter);
}
private void drawRectangles(QPainter painter) {
painter.setPen(QPen.NoPen);
for (int i=1; i<11; i++) {
    painter.setBrush(new QColor(0, 0, 255, i*25));
    painter.drawRect(50*i, 20, 40, 40);
}
}
public static void main(String[] args) {
QApplication.initialize(args);
new JambiApp();
QApplication.exec();
}
}
painter.setPen(QPen.NoPen);We use no pen.
for (int i=1; i<11; i++) {
painter.setBrush(new QColor(0, 0, 255, i*25));
painter.drawRect(50*i, 20, 40, 40);
}
The last parameter of the QColor object is the alpha transparency value. 
Figure: Transparent rectangles
Donut Shape
In the following example we create a complex shape by rotating a bunch of ellipses.package com.zetcode;In this example, we create a donut. The shape resembles a cookie, hence the name donut.
import com.trolltech.qt.core.QPoint;
import com.trolltech.qt.gui.QApplication;
import com.trolltech.qt.gui.QColor;
import com.trolltech.qt.gui.QPaintEvent;
import com.trolltech.qt.gui.QPainter;
import com.trolltech.qt.gui.QPen;
import com.trolltech.qt.gui.QWidget;
/**
* ZetCode QtJambi tutorial
*
* This program draws a donut
* shape
*
* @author jan bodnar
* website zetcode.com
* last modified March 2009
*/
public class JambiApp extends QWidget {
public JambiApp() {
setWindowTitle("Donut");
resize(350, 280);
move(400, 300);
show();
}
@Override
protected void paintEvent(QPaintEvent event) {
QPainter painter = new QPainter(this);
drawDonut(painter);
}
private void drawDonut(QPainter painter) {
QColor color = new QColor();
color.setNamedColor("#333333");
painter.setPen(new QPen(color, 0.5));
painter.setRenderHint(QPainter.RenderHint.Antialiasing);
int w = width();
int h = height();
painter.translate(new QPoint(w/2, h/2));
for (double rot=0; rot < 360.0; rot+=5.0 ) {
    painter.drawEllipse(-125, -40, 250, 80);
    painter.rotate(5.0);
}
}
public static void main(String[] args) {
QApplication.initialize(args);
new JambiApp();
QApplication.exec();
}
}
QColor color = new QColor();We can use a hexadecimal notation to create a color object.
color.setNamedColor("#333333");
int w = width();Here we determine the width and height of the window.
int h = height();
painter.translate(new QPoint(w/2, h/2));We move the coordinate system to the middle of the window. This way we make the drawing mathematically easier.
for (double rot=0; rot < 360.0; rot+=5.0 ) {
painter.drawEllipse(-125, -40, 250, 80);
painter.rotate(5.0);
}
We draw an ellipse object 72 times. Each time, we rotate the ellipse by 5 degrees. This will create our donut shape. 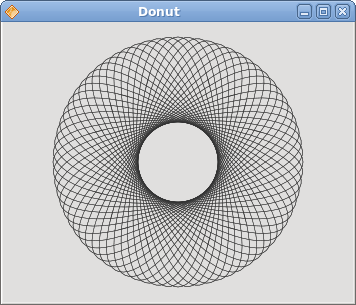
Figure: Donut
Drawing text
In the last example, we are going to draw text on the window.package com.zetcode;We draw a song lyrics on the window.
import com.trolltech.qt.core.QPoint;
import com.trolltech.qt.gui.QApplication;
import com.trolltech.qt.gui.QColor;
import com.trolltech.qt.gui.QFont;
import com.trolltech.qt.gui.QPaintEvent;
import com.trolltech.qt.gui.QPainter;
import com.trolltech.qt.gui.QWidget;
/**
* ZetCode QtJambi tutorial
*
* This program draws text
* on the window
*
* @author jan bodnar
* website zetcode.com
* last modified March 2009
*/
public class JambiApp extends QWidget {
public JambiApp() {
setWindowTitle("Soulmate");
resize(370, 240);
move(400, 300);
show();
}
@Override
protected void paintEvent(QPaintEvent event) {
QPainter painter = new QPainter(this);
drawLyrics(painter);
}
private void drawLyrics(QPainter painter) {
painter.setBrush(new QColor(25, 25, 25));
painter.setFont(new QFont("Purisa", 10));
painter.drawText(new QPoint(20, 30),
        "Most relationships seem so transitory");
painter.drawText(new QPoint(20, 60),
"They're good but not the permanent one");
painter.drawText(new QPoint(20, 120),
"Who doesn't long for someone to hold");
painter.drawText(new QPoint(20, 150),
"Who knows how to love without being told");
painter.drawText(new QPoint(20, 180),
"Somebody tell me why I'm on my own");
painter.drawText(new QPoint(20, 210),
"If there's a soulmate for everyone");
}
public static void main(String[] args) {
QApplication.initialize(args);
new JambiApp();
QApplication.exec();
}
}
painter.setFont(new QFont("Purisa", 10));
We set a Purisa font for our text. painter.drawText(new QPoint(20, 30),The drawText() method is used to draw the text.
"Most relationships seem so transitory");
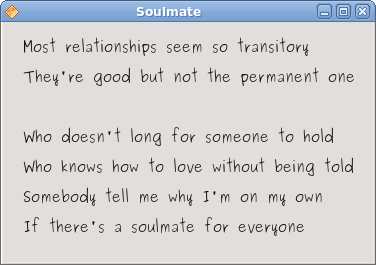
Figure: Drawing text
In this part of the QtJambi programming tutorial, we did some painting.
No comments:
Post a Comment