Custom widget in GTK#
Have you ever looked at an application and wondered, how a particular gui item was created? Probably every wannabe programmer has. Then you were looking at a list of widgets provided by your favourite gui library. But you couldn't find it. Toolkits usually provide only the most common widgets like buttons, text widgets, sliders etc. No toolkit can provide all possible widgets.There are actually two kinds of toolkits. Spartan toolkits and heavy weight toolkits. The FLTK toolkit is a kind of a spartan toolkit. It provides only the very basic widgets and assumes, that the programemer will create the more complicated ones himself. wxWidgets is a heavy weight one. It has lots of widgets. Yet it does not provide the more specialized widgets. For example a speed meter widget, a widget that measures the capacity of a CD to be burned (found e.g. in nero). Toolkits also don't have usually charts.
Programmers must create such widgets by themselves. They do it by using the drawing tools provided by the toolkit. There are two possibilities. A programmer can modify or enhance an existing widget. Or he can create a custom widget from scratch.
Burning widget
This is an example of a widget, that we create from scratch. This widget can be found in various media burning applications, like Nero Burning ROM.burning.cs
using Gtk;We put a
using Cairo;
using System;
class Burning : DrawingArea
{
string[] num = new string[] { "75", "150", "225", "300",
    "375", "450", "525", "600", "675" };
public Burning() : base()
{
SetSizeRequest(-1, 30);
}
protected override bool OnExposeEvent(Gdk.EventExpose args)
{
Cairo.Context cr = Gdk.CairoHelper.Create(args.Window);
cr.LineWidth = 0.8;
cr.SelectFontFace("Courier 10 Pitch",
FontSlant.Normal, FontWeight.Normal);
cr.SetFontSize(11);
int width = Allocation.Width;
SharpApp parent = (SharpApp) GetAncestor (Gtk.Window.GType);
int cur_width = parent.CurValue;
int step = (int) Math.Round(width / 10.0);
int till = (int) ((width / 750.0) * cur_width);
int full = (int) ((width / 750.0) * 700);
if (cur_width >= 700) {
cr.SetSourceRGB(1.0, 1.0, 0.72);
cr.Rectangle(0, 0, full, 30);
cr.Clip();
cr.Paint();
cr.ResetClip();
cr.SetSourceRGB(1.0, 0.68, 0.68);
cr.Rectangle(full, 0, till-full, 30);
cr.Clip();
cr.Paint();
cr.ResetClip();
} else {
cr.SetSourceRGB(1.0, 1.0, 0.72);
cr.Rectangle(0, 0, till, 30);
cr.Clip();
cr.Paint();
cr.ResetClip();
}
cr.SetSourceRGB(0.35, 0.31, 0.24);
for (int i=1; i<=num.Length; i++) {
cr.MoveTo(i*step, 0);
cr.LineTo(i*step, 5);
cr.Stroke();
TextExtents extents = cr.TextExtents(num[i-1]);
cr.MoveTo(i*step-extents.Width/2, 15);
cr.TextPath(num[i-1]);
cr.Stroke();
}
((IDisposable) cr.Target).Dispose();
((IDisposable) cr).Dispose();
return true;
}
}
class SharpApp : Window {
int cur_value = 0;
Burning burning;
public SharpApp() : base("Burning")
{
SetDefaultSize(350, 200);
SetPosition(WindowPosition.Center);
DeleteEvent += delegate { Application.Quit(); };
VBox vbox = new VBox(false, 2);
HScale scale = new HScale(0, 750, 1);
scale.SetSizeRequest(160, 35);
scale.ValueChanged += OnChanged;
Fixed fix = new Fixed();
fix.Put(scale, 50, 50);
vbox.PackStart(fix);
burning = new Burning();
vbox.PackStart(burning, false, false, 0);
Add(vbox);
ShowAll();
}
void OnChanged(object sender, EventArgs args)
{
    Scale scale = (Scale) sender;
    cur_value = (int) scale.Value;
    burning.QueueDraw();
}
public int CurValue {
get { return cur_value; }
}
public static void Main()
{
Application.Init();
new SharpApp();
Application.Run();
}
}
DrawingArea on the bottom of the window and draw the entire widget manually. All the important code resides in the OnExposeEvent() method of the Burning class. This widget shows graphically the total capacity of a medium and the free space available to us. The widget is controlled by a scale widget. The minimum value of our custom widget is 0, the maximum is 750. If we reach value 700, we began drawing in red colour. This normally indicates overburning. string[] num = new string[] { "75", "150", "225", "300",
"375", "450", "525", "600", "675" };
These numbers are shown on the burning widget. They show the capacity of the medium. SharpApp parent = (SharpApp) GetAncestor (Gtk.Window.GType);These two lines get the current number from the scale widget. We get the parent widget and from the parent widget, we get the current value.
int cur_width = parent.CurValue;
int till = (int) ((width / 750.0) * cur_width);The till parameter determines the total size to be drawn. This value comes from the slider widget. It is a proportion of the whole area. The full parameter determines the point, where we begin to draw in red color.
int full = (int) ((width / 750.0) * 700);
cr.SetSourceRGB(1.0, 1.0, 0.72);This code here, draws a yellow rectangle up to point, where the medium is full.
cr.Rectangle(0, 0, full, 30);
cr.Clip();
cr.Paint();
cr.ResetClip();
TextExtents extents = cr.TextExtents(num[i-1]);This code here draws the numbers on the burning widget. We calculate the
cr.MoveTo(i*step-extents.Width/2, 15);
cr.TextPath(num[i-1]);
cr.Stroke();
TextExtents to position the text correctly. void OnChanged(object sender, EventArgs args)We get the value from the scale widget, store it in the
{
Scale scale = (Scale) sender;
cur_value = (int) scale.Value;
burning.QueueDraw();
}
cur_value variable for later use. We redraw the burning widget. 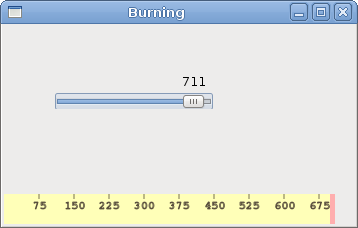
Figure: Burning widget
In this chapter, we created a custom widget in GTK#.
No comments:
Post a Comment