Introduction to QtJambi
In this part of the QtJambi programming tutorial, we will introduce the QtJambi toolkit and create our first QtJambi programs.The purpose of this tutorial is to get you started with the QtJambi toolkit. Images used in this tutorial can be downloaded here. I used some icons from the tango icons pack of the Gnome project.
About
QtJambi is a cross platform toolkit for creating graphical user interfaces. It is based on two highly successful technologies. The Qt library and the Java programming language. Qt is a powerful cross-platform application development framework. Its native language is C++. Java is wildly successful programming language. QtJambi is a Java binding of the Qt library. Unlike Python, C# and Ruby bindings, Java binding is officially supported by the Nokia company.Creating a Tooltip
The first example will show a tooltip. A tooltip is a small rectangular window, which gives a brief information about an object. It is usually a GUI component. It is part of the help system of the application.package com.zetcode;The example creates a window. If we hover a mouse pointer over the area of the window, a tooltip pops up.
import com.trolltech.qt.gui.QApplication;
import com.trolltech.qt.gui.QWidget;
/**
* ZetCode QtJambi tutorial
*
* This program displays a
* tooltip
*
* @author jan bodnar
* website zetcode.com
* last modified March 2009
*/
public class JambiApp extends QWidget {
public JambiApp() {
setWindowTitle("Tooltip");
setToolTip("This is QWidget");
resize(250, 150);
move(300, 300);
show();
}
public static void main(String args[])
{
QApplication.initialize(args);
new JambiApp();
QApplication.exec();
}
}
import com.trolltech.qt.gui.QApplication;These are necessary imports of components that we use in the code example.
import com.trolltech.qt.gui.QWidget;
public class JambiApp extends QWidget {
The example inherits from a QWidget. The QWidget class is the base class of all user interface objects. The widget is the atom of the user interface. It receives mouse, keyboard and other events from the window system. setWindowTitle("Tooltip");
This method call creates a title for the window. setToolTip("This is QWidget");
The setToolTip method creates a tooltip for the QWidget object. resize(250, 150);Here we set the width and the height of the window.
move(300, 300);The move() method moves the window on the screen.
show();When everything is ready, we show the window on the screen.
QApplication.initialize(args);These three lines set up the application.
new JambiApp();
QApplication.exec();
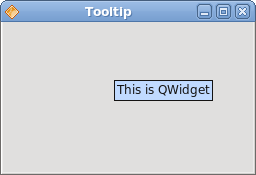
Figure: Tooltip
Centering a window
In the second example, we will center the window on the screen.package com.zetcode;The QtJambi does not have a single method to center a window.
import com.trolltech.qt.gui.QApplication;
import com.trolltech.qt.gui.QDesktopWidget;
import com.trolltech.qt.gui.QWidget;
/**
* ZetCode QtJambi tutorial
*
* This program centers a window
* on the screen
*
* @author jan bodnar
* website zetcode.com
* last modified April 2009
*/
public class JambiApp extends QWidget {
private final int WIDTH = 250;
private final int HEIGHT = 150;
public JambiApp() {
QDesktopWidget qdw = new QDesktopWidget();
int screenWidth = qdw.width();
int screenHeight = qdw.height();
int x = (screenWidth - WIDTH) / 2;
int y = (screenHeight - HEIGHT) / 2;
resize(WIDTH, HEIGHT);
move(x, y);
setWindowTitle("Center");
show();
}
public static void main(String[] args) {
QApplication.initialize(args);
new JambiApp();
QApplication.exec();
}
}
private final int WIDTH = 250;These two constants define the width and height of the application window.
private final int HEIGHT = 150;
QDesktopWidget qdw = new QDesktopWidget();The QDesktopWidget class provides information about the screen.
int screenWidth = qdw.width();Here we determine the screen width and height.
int screenHeight = qdw.height();
int x = (screenWidth - WIDTH) / 2;Here we calculate the x, y coordinates of the centered window. To center a window on the screen, we need to know the size of the screen and the size of the window.
int y = (screenHeight - HEIGHT) / 2;
move(x, y);We move the window to the computed x, y coordinates.
Quit button
In the last example of this section, we will create a quit button. When we press this button, the application terminates.package com.zetcode;We use the QPushButton.This is a very common widget. It is a rectangular and usually shows a text label.
import com.trolltech.qt.gui.QApplication;
import com.trolltech.qt.gui.QPushButton;
import com.trolltech.qt.gui.QWidget;
/**
* ZetCode QtJambi tutorial
*
* This program creates a quit
* button. When we press the button,
* the application terminates
*
* @author jan bodnar
* website zetcode.com
* last modified April 2009
*/
public class JambiApp extends QWidget
{
public JambiApp() {
setWindowTitle("Quit button");
initUI();
resize(250, 150);
move(300, 300);
show();
}
private void initUI() {
QPushButton quit = new QPushButton("Quit", this);
quit.setGeometry(30, 30, 75, 30);
quit.clicked.connect(QApplication.instance(), "quit()");
}
public static void main(String args[])
{
QApplication.initialize(args);
new JambiApp();
QApplication.exec();
}
}
initUI();We delegate the creation of the user interface to the initUI() method.
QPushButton quit = new QPushButton("Quit", this);
We create the button widget. The first parameter of the constructor is the label, which the button displays. The second parameter is the parent widget of the button. quit.setGeometry(30, 30, 75, 30);We position and size the button widget. The first two parameters are the x, y coordinates of the button. The last two parameters are the width and height of the button.
quit.clicked.connect(QApplication.instance(), "quit()");The clicked signal is emitted, when we click on the button. The connect() method connects a signal to a particular slot of an object. The first parameter of the method is the object, that receives the signal. In our case it is the application object. The second parameter is the method, which is called. In our case it is the quit()method of the application object.
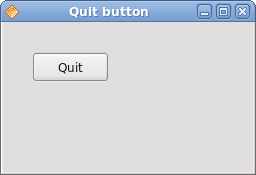
Figure: Quit button
This section was an introduction to the QtJambi toolkit.
No comments:
Post a Comment