Layout management in QtJambi
In this part of the QtJambi programming tutorial, we will introduce layout managers.When we design the GUI of our application, we decide what components we will use and how we will organize those components in the application. To organize our components, we use specialized non visible objects called layout managers. There are several options in QtJambi. We can use absolute positioning, built-in layout managers or create a custom layout manager. We can also visually build the layouts using the Qt Designer.
QtJambi has some important built-in layout managers. The QVBoxLayout class lines up widgets vertically. QHBoxLayout lines up widgets horizontally. The QGridLayout class lays out widgets in a grid. The grid layout is the most flexible layout manager. The box layouts nest into one another to create complex layouts.
Absolute positioning
In most cases, programmers should use layout managers. There are a few situations, where we can use absolute positioning. In absolute positioning, the programmer specifies the position and the size of each widget in pixels. The size and the position of a widget do not change, if you resize a window. Applications look different on various platforms, and what looks OK on Linux, might not look OK on Mac. Changing fonts in your application might spoil the layout. If you translate your application into another language, you must redo your layout. For all these issues, use the absolute positioning only when you have a reason to do so.package com.zetcode;In this example, we show three images using the absolute positioning.
import com.trolltech.qt.gui.QApplication;
import com.trolltech.qt.gui.QLabel;
import com.trolltech.qt.gui.QPixmap;
import com.trolltech.qt.gui.QWidget;
/**
* ZetCode QtJambi tutorial
*
* In this program, we lay out widgets
* using absolute positioning
*
* @author jan bodnar
* website zetcode.com
* last modified April 2009
*/
public class JambiApp extends QWidget {
public JambiApp() {
setWindowTitle("Absolute");
initUI();
resize(300, 280);
move(300, 300);
show();
}
private void initUI() {
setStyleSheet("QWidget { background-color: #414141 }");
QPixmap bardejov = new QPixmap("bardejov.jpg");
QPixmap rotunda = new QPixmap("rotunda.jpg");
QPixmap mincol = new QPixmap("mincol.jpg");
QLabel barLabel = new QLabel(this);
barLabel.setPixmap(bardejov);
barLabel.move(20, 20);
QLabel rotLabel = new QLabel(this);
rotLabel.setPixmap(rotunda);
rotLabel.move(40, 160);
QLabel minLabel = new QLabel(this);
minLabel.setPixmap(mincol);
minLabel.move(170, 50);
}
public static void main(String[] args) {
QApplication.initialize(args);
new JambiApp();
QApplication.exec();
}
}
QLabel barLabel = new QLabel(this);The QLabel widget is used to hold the image.
barLabel.setPixmap(bardejov);
barLabel.move(20, 20);We use the move() method to position the label on the window at x=20, y=20.
When we resize the window, the labels retain their initial size.
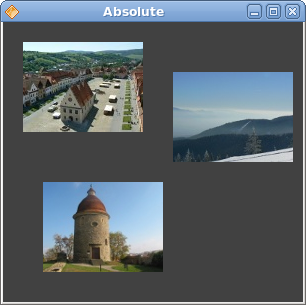
Figure: Absolute positioning
Buttons example
In the following example, we will position two buttons in the bottom right corner of the window.package com.zetcode;We use nested box layouts to get our intended layout.
import com.trolltech.qt.core.Qt;
import com.trolltech.qt.gui.QApplication;
import com.trolltech.qt.gui.QHBoxLayout;
import com.trolltech.qt.gui.QPushButton;
import com.trolltech.qt.gui.QVBoxLayout;
import com.trolltech.qt.gui.QWidget;
/**
* ZetCode QtJambi tutorial
*
* In this program, use box layouts
* to position two buttons in the
* bottom right corner of the window
*
* @author jan bodnar
* website zetcode.com
* last modified April 2009
*/
public class JambiApp extends QWidget {
public JambiApp() {
setWindowTitle("Buttons");
initUI();
resize(300, 150);
move(300, 300);
show();
}
private void initUI() {
QVBoxLayout vbox = new QVBoxLayout(this);
QHBoxLayout hbox = new QHBoxLayout();
QPushButton ok = new QPushButton("OK", this);
QPushButton apply = new QPushButton("Apply", this);
hbox.addWidget(ok, 1, Qt.AlignmentFlag.AlignRight);
hbox.addWidget(apply);
vbox.addStretch(1);
vbox.addLayout(hbox);
}
public static void main(String[] args) {
QApplication.initialize(args);
new JambiApp();
QApplication.exec();
}
}
QVBoxLayout vbox = new QVBoxLayout(this);We use one vertical and one horizontal box.
QHBoxLayout hbox = new QHBoxLayout();
QPushButton ok = new QPushButton("OK", this);
QPushButton apply = new QPushButton("Apply", this);
These are the two buttons, that will go into the bottom right corner of the window. hbox.addWidget(ok, 1, Qt.AlignmentFlag.AlignRight);We put the ok button into the horizontal box. The second parameter is the stretch factor. It expands the area allotted to the ok button. It takes all available space left. Inside this area, the button is aligned to the right.
vbox.addStretch(1);This line creates a vertically expanded white space, which will push the horizontal box with the buttons to the bottom.
vbox.addLayout(hbox);The horizontal box is nested into the vertical box.
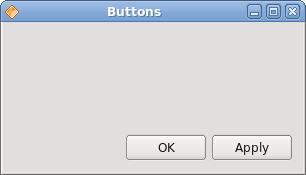
Figure: Buttons example
Windows example
The following is a more complicated example with nested box layouts.package com.zetcode;In this layout, we use two vertical and horizontal boxes.
import com.trolltech.qt.core.Qt.AlignmentFlag;
import com.trolltech.qt.gui.QApplication;
import com.trolltech.qt.gui.QHBoxLayout;
import com.trolltech.qt.gui.QLabel;
import com.trolltech.qt.gui.QPushButton;
import com.trolltech.qt.gui.QTextEdit;
import com.trolltech.qt.gui.QVBoxLayout;
import com.trolltech.qt.gui.QWidget;
/**
* ZetCode QtJambi tutorial
*
* In this program, use box layouts
* to create a windows example
*
* @author jan bodnar
* website zetcode.com
* last modified April 2009
*/
public class JambiApp extends QWidget {
public JambiApp() {
setWindowTitle("Windows");
initUI();
resize(350, 300);
move(300, 300);
show();
}
private void initUI() {
QVBoxLayout vbox = new QVBoxLayout(this);
QVBoxLayout vbox1 = new QVBoxLayout();
QHBoxLayout hbox1 = new QHBoxLayout();
QHBoxLayout hbox2 = new QHBoxLayout();
QLabel windLabel = new QLabel("Windows", this);
QTextEdit edit = new QTextEdit(this);
edit.setEnabled(false);
QPushButton activate = new QPushButton("Activate", this);
QPushButton close = new QPushButton("Close", this);
QPushButton help = new QPushButton("Help", this);
QPushButton ok = new QPushButton("OK", this);
vbox.addWidget(windLabel);
vbox1.addWidget(activate);
vbox1.addWidget(close, 0, AlignmentFlag.AlignTop);
hbox1.addWidget(edit);
hbox1.addLayout(vbox1);

vbox.addLayout(hbox1);
hbox2.addWidget(help);
hbox2.addStretch(1);
hbox2.addWidget(ok);

vbox.addLayout(hbox2, 1);
setLayout(vbox);
}
public static void main(String[] args) {
QApplication.initialize(args);
new JambiApp();
QApplication.exec();
}
}
QVBoxLayout vbox = new QVBoxLayout(this);This is the base layout of the example.
vbox.addWidget(windLabel);First goes the label widget. It goes simply to the top of the vertical box.
vbox1.addWidget(activate);In the center part of the window we have a text edit widget and two vertically lined up buttons. The buttons go into a vertical box. The buttons are aligned to the top within this vertical box. The vertical box and the text edit go into a horizontal box. This horizontal box goes to the base vertical box, just below the label widget.
vbox1.addWidget(close, 0, AlignmentFlag.AlignTop);
hbox1.addWidget(edit);
hbox1.addLayout(vbox1);
vbox.addLayout(hbox1);
hbox2.addWidget(help);The help and the ok button go into another horizontal box. There is an expanded white space between these two buttons. Again, the horizontal box goes to the base vertical box.
hbox2.addStretch(1);
hbox2.addWidget(ok);
vbox.addLayout(hbox2, 1);
setLayout(vbox);The base vertical box is set to be the main layout of the window.
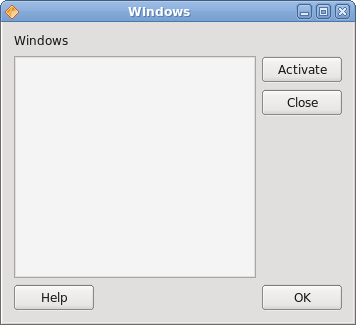
Figure: Windows example
New Folder example
In the last example, we use the QGridLayout manager to create a New Folder layout example.package com.zetcode;In our example, we have one label, one line edit, one text edit and two buttons.
import com.trolltech.qt.gui.QApplication;
import com.trolltech.qt.gui.QGridLayout;
import com.trolltech.qt.gui.QLabel;
import com.trolltech.qt.gui.QLineEdit;
import com.trolltech.qt.gui.QPushButton;
import com.trolltech.qt.gui.QTextEdit;
import com.trolltech.qt.gui.QWidget;
/**
* ZetCode QtJambi tutorial
*
* In this program, use the QGridLayout
* to create a New Folder example
*
* @author jan bodnar
* website zetcode.com
* last modified April 2009
*/
public class JambiApp extends QWidget {
public JambiApp() {
setWindowTitle("New Folder");
initUI();
move(300, 300);
show();
}
private void initUI() {
QGridLayout grid = new QGridLayout(this);
QLabel nameLabel = new QLabel("Name", this);
QLineEdit nameEdit = new QLineEdit(this);
QTextEdit text = new QTextEdit(this);
QPushButton okButton = new QPushButton("OK", this);
QPushButton closeButton = new QPushButton("Close", this);
grid.addWidget(nameLabel, 0, 0);
grid.addWidget(nameEdit, 0, 1, 1, 3);
grid.addWidget(text, 1, 0, 2, 4);
grid.setColumnStretch(1, 1);
grid.addWidget(okButton, 4, 2);
grid.addWidget(closeButton, 4, 3);
}
public static void main(String[] args) {
QApplication.initialize(args);
new JambiApp();
QApplication.exec();
}
}
QGridLayout grid = new QGridLayout(this);We create an instance of the QGridLayout manager.
grid.addWidget(nameLabel, 0, 0);We place the label widget in the first cell of the grid. The cells count from 0. The last two parameters are the row and column number.
grid.addWidget(nameEdit, 0, 1, 1, 3);The line edit widget is placed at the first row, second column. The last two parameters are the row span and the column span. Horizontally, the widget will span three columns.
grid.setColumnStretch(1, 1);The parameters of the method are the column number and the stretch factor. Here we set stretch factor 1 to the second column. This means, that this column will take all remaining space. This was set, because we wanted our buttons to retain their initial size.
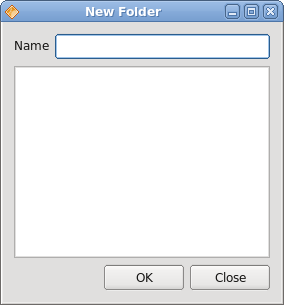
Figure: New Folder example
In this part of the QtJambi tutorial, we mentioned layout management of widgets.
No comments:
Post a Comment