Showing posts with label Ruby GTK. Show all posts
Showing posts with label Ruby GTK. Show all posts
Monday, April 15, 2013
Nibbles Clone Game in Ruby GTK
Nibbles
In this part of the Ruby GTK programming tutorial, we will create a Nibbles game clone.Nibbles is an older classic video game. It was first created in late 70s. Later it was brought to PCs. In this game the player controls a snake. The objective is to eat as many apples as possible. Each time the snake eats an apple, its body grows. The snake must avoid the walls and its own body.
Development
The size of each of the joints of a snake is 10px. The snake is controlled with the cursor keys. Initially, the snake has three joints. The game starts immediately. When the game is finished, we display "Game Over" message in the center of the window.board.rb
WIDTH = 300First we will define some globals used in our game.
HEIGHT = 270
DOT_SIZE = 10
ALL_DOTS = WIDTH * HEIGHT / (DOT_SIZE * DOT_SIZE)
RAND_POS = 26
$x = [0] * ALL_DOTS
$y = [0] * ALL_DOTS
class Board < Gtk::DrawingArea
def initialize
super
modify_bg Gtk::STATE_NORMAL, Gdk::Color.new(0, 0, 0)
signal_connect "expose-event" do
on_expose
end
init_game
end
def on_timer
if @inGame
check_apple
check_collision
move
queue_draw
return true
else
return false
end
end
def init_game
@left = false
@right = true
@up = false
@down = false
@inGame = true
@dots = 3
for i in (0..@dots)
$x[i] = 50 - i * 10
$y[i] = 50
end
begin
@dot = Cairo::ImageSurface.from_png "dot.png"
@head = Cairo::ImageSurface.from_png "head.png"
@apple = Cairo::ImageSurface.from_png "apple.png"
rescue Exception => e
puts "cannot load images"
exit
end
locate_apple
GLib::Timeout.add(100) { on_timer }
end
def on_expose
cr = window.create_cairo_context
if @inGame
    draw_objects cr
else
    game_over cr
end
end
def draw_objects cr

    cr.set_source_rgb 0, 0, 0
    cr.paint

    cr.set_source @apple, @apple_x, @apple_y
    cr.paint

    for z in (0..@dots)
        if z == 0
            cr.set_source @head, $x[z], $y[z]
            cr.paint
        else
            cr.set_source @dot, $x[z], $y[z]
            cr.paint
        end
    end
end
def game_over cr
w = allocation.width / 2
h = allocation.height / 2
cr.set_font_size 15
te = cr.text_extents "Game Over"
cr.set_source_rgb 65535, 65535, 65535
cr.move_to w - te.width/2, h
cr.show_text "Game Over"
end
def check_apple

    if $x[0] == @apple_x and $y[0] == @apple_y
        @dots = @dots + 1
        locate_apple
    end
end
def move
z = @dots
while z > 0
    $x[z] = $x[(z - 1)]
    $y[z] = $y[(z - 1)]
    z = z - 1
end
if @left
    $x[0] -= DOT_SIZE
end
if @right
$x[0] += DOT_SIZE
end
if @up
$y[0] -= DOT_SIZE
end
if @down
$y[0] += DOT_SIZE
end
end
def check_collision
z = @dots
while z > 0
    if z > 4 and $x[0] == $x[z] and $y[0] == $y[z]
        @inGame = false
    end
    z = z - 1
end
if $y[0] > HEIGHT - DOT_SIZE
    @inGame = false
end
if $y[0] < 0
@inGame = false
end
if $x[0] > WIDTH - DOT_SIZE
@inGame = false
end
if $x[0] < 0
@inGame = false
end
end
def locate_apple
r = rand(RAND_POS)
@apple_x = r * DOT_SIZE
r = rand(RAND_POS)
@apple_y = r * DOT_SIZE
end
def on_key_down event
key = event.keyval
if key == Gdk::Keyval::GDK_Left and not @right
    @left = true
    @up = false
    @down = false
end
if key == Gdk::Keyval::GDK_Right and not @left
@right = true
@up = false
@down = false
end
if key == Gdk::Keyval::GDK_Up and not @down
@up = true
@right = false
@left = false
end
if key == Gdk::Keyval::GDK_Down and not @up
@down = true
@right = false
@left = false
end
end
end
The WIDTH and HEIGHT constants determine the size of the Board. The DOT_SIZE is the size of the apple and the dot of the snake. The ALL_DOTS constant defines the maximum number of possible dots on the Board. The RAND_POS constant is used to calculate a random position of an apple. The DELAY constant determines the speed of the game.
$x = [0] * ALL_DOTSThese two arrays store x, y coordinates of all possible joints of a snake.
$y = [0] * ALL_DOTS
The
init_game method initializes variables, loads images and starts a timeout function. if @inGameInside the
draw_objects cr
else
game_over cr
end
on_expose method, we check the @inGamevariable. If it is true, we draw our objects. The apple and the snake joints. Otherwise we display "Game over" text. def draw_objects crThe
cr.set_source_rgb 0, 0, 0
cr.paint
cr.set_source @apple, @apple_x, @apple_y
cr.paint
for z in (0..@dots)
if z == 0
cr.set_source @head, $x[z], $y[z]
cr.paint
else
cr.set_source @dot, $x[z], $y[z]
cr.paint
end
end
end
draw_objects method draws the apple and the joints of the snake. The first joint of a snake is its head, which is represented by a red circle. def check_appleThe
if $x[0] == @apple_x and $y[0] == @apple_y
@dots = @dots + 1
locate_apple
end
end
check_apple method checks, if the snake has hit the apple object. If so, we add another snake joint and call the locate_apple method, which randomly places a new apple object. In the
move method we have the key algorithm of the game. To understand it, look at how the snake is moving. You control the head of the snake. You can change its direction with the cursor keys. The rest of the joints move one position up the chain. The second joint moves where the first was, the third joint where the second was etc. while z > 0This code moves the joints up the chain.
$x[z] = $x[(z - 1)]
$y[z] = $y[(z - 1)]
z = z - 1
end
if @leftMove the head to the left.
$x[0] -= DOT_SIZE
end
In the
check_collision method, we determine if the snake has hit itself or one of the walls. while z > 0Finish the game, if the snake hits one of its joints with the head.
if z > 4 and $x[0] == $x[z] and $y[0] == $y[z]
@inGame = false
end
z = z - 1
end
if $y[0] > HEIGHT - DOT_SIZEFinish the game, if the snake hits the bottom of the Board.
@inGame = false
end
The
locate_apple method locates an apple randomly on the board. r = rand(RAND_POS)We get a random number from 0 to RAND_POS - 1.
@apple_x = r * DOT_SIZEThese line set the x, y coordinates of the apple object.
...
@apple_y = r * DOT_SIZE
if @inGameEvery 140 ms, the
check_apple
check_collision
move
queue_draw
return true
else
return false
end
on_timer method is called. If we are in the game, we call three methods, that build the logic of the game. Otherwise we return false, which stops the timer event. In the
on_key_down method of the Board class, we determine the keys that were pressed. if key == Gdk::Keyval::GDK_Left and not @rightIf we hit the left cursor key, we set
@left = true
@up = false
@down = false
end
left variable to true. This variable is used in the movemethod to change coordinates of the snake object. Notice also, that when the snake is heading to the right, we cannot turn immediately to the left. nibbles.rb
#!/usr/bin/rubyIn this class, we set up the Nibbles game.
# ZetCode Ruby GTK tutorial
#
# This is a simple nibbles game
# clone
#
# author: jan bodnar
# website: www.zetcode.com
# last modified: June 2009
require 'gtk2'
require 'board'
class RubyApp > Gtk::Window
def initialize
super
set_title "Nibbles"
signal_connect "destroy" do
Gtk.main_quit
end
@board = Board.new
signal_connect "key-press-event" do |w, e|
on_key_down(w, e)
end
add @board
set_default_size 300, 270
set_window_position Gtk::Window::POS_CENTER
show_all
end
def on_key_down widget, event

    key = event.keyval
    @board.on_key_down event
end
end
Gtk.init
window = RubyApp.new
Gtk.main
def on_key_down widget, eventIn this class, we catch the key press events. And delegate the processing to the
key = event.keyval
@board.on_key_down event
end
on_key_down method of the board class. 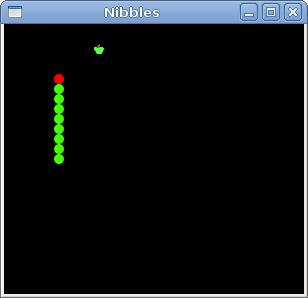
Figure: Nibbles
This was the Nibbles computer game programmed with the GTK library and the Ruby programming language. Custom widget in Ruby GTK
Custom widget
Most toolkits usually provide only the most common widgets like buttons, text widgets, sliders etc. No toolkit can provide all possible widgets. Programmers must create such widgets by themselves. They do it by using the drawing tools provided by the toolkit. There are two possibilities. A programmer can modify or enhance an existing widget. Or he can create a custom widget from scratch.Burning widget
This is an example of a widget, that we create from scratch. This widget can be found in various media burning applications, like Nero Burning ROM.custom.rb
#!/usr/bin/rubyWe put a
# ZetCode Ruby GTK tutorial
#
# This example creates a burning
# custom widget
#
# author: jan bodnar
# website: zetcode.com
# last edited: June 2009
require 'gtk2'
class Burning < Gtk::DrawingArea
def initialize(parent)
@parent = parent
super()
@num = [ "75", "150", "225", "300",
    "375", "450", "525", "600", "675" ]
set_size_request 1, 30
signal_connect "expose-event" do
expose
end
end
def expose
cr = window.create_cairo_context
draw_widget cr
end
def draw_widget cr
cr.set_line_width 0.8
cr.select_font_face("Courier",
Cairo::FONT_SLANT_NORMAL, Cairo::FONT_WEIGHT_NORMAL)
cr.set_font_size 11
width = allocation.width
@cur_width = @parent.get_cur_value
step = (width / 10.0).round
till = (width / 750.0) * @cur_width
full = (width / 750.0) * 700
if @cur_width >= 700
cr.set_source_rgb(1.0, 1.0, 0.72)
cr.rectangle(0, 0, full, 30)
cr.clip
cr.paint
cr.reset_clip
cr.set_source_rgb(1.0, 0.68, 0.68)
cr.rectangle(full, 0, till-full, 30)
cr.clip
cr.paint
cr.reset_clip
else
cr.set_source_rgb 1.0, 1.0, 0.72
cr.rectangle 0, 0, till, 30
cr.clip
cr.paint
cr.reset_clip
end
cr.set_source_rgb(0.35, 0.31, 0.24)
for i in (1..@num.length)
cr.move_to i*step, 0
cr.line_to i*step, 5
cr.stroke
te = cr.text_extents @num[i-1]
cr.move_to i*step-te.width/2, 15
cr.text_path @num[i-1]
cr.stroke
end
end
end
class RubyApp < Gtk::Window
def initialize
super
set_title "Burning"
signal_connect "destroy" do
Gtk.main_quit
end
set_size_request 350, 200
set_window_position Gtk::Window::POS_CENTER
@cur_value = 0
vbox = Gtk::VBox.new false, 2
scale = Gtk::HScale.new
scale.set_range 0, 750
scale.set_digits 0
scale.set_size_request 160, 35
scale.set_value @cur_value
scale.signal_connect "value-changed" do |w|
on_changed(w)
end
fix = Gtk::Fixed.new
fix.put scale, 50, 50
vbox.pack_start fix
@burning = Burning.new(self)
vbox.pack_start @burning, false, false, 0
add vbox
show_all
end
def on_changed widget

    @cur_value = widget.value
    @burning.queue_draw
end
def get_cur_value
return @cur_value
end
end
Gtk.init
window = RubyApp.new
Gtk.main
DrawingArea on the bottom of the window and draw the entire widget manually. All the important code resides in the draw_widget which is called from the expose method of the Burning class. This widget shows graphically the total capacity of a medium and the free space available to us. The widget is controlled by a scale widget. The minimum value of our custom widget is 0, the maximum is 750. If we reach value 700, we began drawing in red colour. This normally indicates overburning. @num = [ "75", "150", "225", "300",These numbers are shown on the burning widget. They show the capacity of the medium.
"375", "450", "525", "600", "675" ]
@cur_width = @parent.get_cur_valueFrom the parent widget, we get the current value of the scale widget.
till = (width / 750.0) * @cur_widthWe use the
full = (width / 750.0) * 700
width variable to do the transformations. Between the values of the scale and the custom widget's measures. Note that we use floating point values. We get greater precision in drawing. The till parameter determines the total size to be drawn. This value comes from the slider widget. It is a proportion of the whole area. The full parameter determines the point, where we begin to draw in red color. cr.set_source_rgb(1.0, 1.0, 0.72)We draw a yellow rectangle up to point, where the medium is full.
cr.rectangle(0, 0, full, 30)
cr.clip
cr.paint
cr.reset_clip
te = cr.text_extents @num[i-1]This code here draws the numbers on the burning widget. We calculate the text extents to position the text correctly.
cr.move_to i*step-te.width/2, 15
cr.text_path @num[i-1]
cr.stroke
def on_changed widgetWe get the value from the scale widget, store it in the
@cur_value = widget.value
@burning.queue_draw
end
@cur_value variable for later use. We redraw the burning widget. 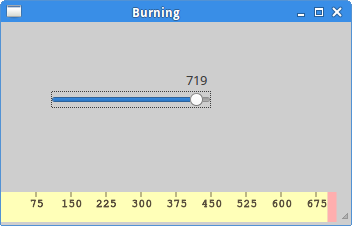
Figure: Burning widget
In this chapter, we created a custom widget in GTK and Ruby programming language. Painting with Cairo in Ruby GTK
Painting with Cairo
In this part of the Ruby GTK tutorial, we will do some painting with the Cairo library.Cairo is a library for creating 2D vector graphics. We can use it to draw our own widgets, charts or various effects or animations.
Colors
In the first example, we will work with colors. A color is an object representing a combination of Red, Green, and Blue (RGB) intensity values. Cairo valid RGB values are in the range 0 to 1.#!/usr/bin/rubyIn our example, we will draw three rectangles and fill them with three different colors.
# ZetCode Ruby GTK tutorial
#
# This program shows how to work
# with colors in Cairo
#
# author: jan bodnar
# website: www.zetcode.com
# last modified: June 2009
require 'gtk2'
class RubyApp < Gtk::Window
def initialize
super
set_title "Colors"
signal_connect "destroy" do
Gtk.main_quit
end
init_ui
set_default_size 360, 100
set_window_position Gtk::Window::POS_CENTER
show_all
end
def init_ui
@darea = Gtk::DrawingArea.new
@darea.signal_connect "expose-event" do
    on_expose
end
add(@darea)
end
def on_expose
cr = @darea.window.create_cairo_context
draw_colors cr
end
def draw_colors cr
cr.set_source_rgb 0.2, 0.23, 0.9
cr.rectangle 10, 15, 90, 60
cr.fill
cr.set_source_rgb 0.9, 0.1, 0.1
cr.rectangle 130, 15, 90, 60
cr.fill
cr.set_source_rgb 0.4, 0.9, 0.4
cr.rectangle 250, 15, 90, 60
cr.fill
end
end
Gtk.init
window = RubyApp.new
Gtk.main
@darea = Gtk::DrawingArea.newWe will be doing our drawing operations on the
DrawingArea widget. @darea.signal_connect "expose-event" doWhen the window needs to be redrawn, the the
on_expose
end
expose-event is triggered. In response to this event, we call the on_expose method. cr = @darea.window.create_cairo_contextWe create the cairo context object from the
GdkWindow of the drawing area. The context is an object onto which we do all our drawings. draw_colors crThe actual drawing is delegated to the
draw_colors method. cr.set_source_rgb 0.2, 0.23, 0.9The
set_source_rgb method sets a color for the cairo context. The three parameters of the method are the color intensity values. cr.rectangle 10, 15, 90, 60We draw a rectangle. The first two parameters are the x, y coordinates of the top left corner of the rectangle. The last two parameters are the width and height of the rectangle.
cr.fillWe fill the inside of the rectangle with the current color.

Figure: Colors
Basic shapes
The next example draws some basic shapes onto the window.#!/usr/bin/rubyIn this example, we will create a rectangle, a square, a circle, an arc and an ellipse. We draw outlines in blue color, insides in white.
# ZetCode Ruby GTK tutorial
#
# This code example draws basic shapes
# with the Cairo library
#
# author: jan bodnar
# website: www.zetcode.com
# last modified: June 2009
require 'gtk2'
class RubyApp < Gtk::Window
def initialize
super
set_title "Basic shapes"
signal_connect "destroy" do
Gtk.main_quit
end
init_ui
set_default_size 390, 240
set_window_position Gtk::Window::POS_CENTER
show_all
end
def init_ui
@darea = Gtk::DrawingArea.new
@darea.signal_connect "expose-event" do
on_expose
end
add(@darea)
end
def on_expose
cr = @darea.window.create_cairo_context
draw_shapes cr
end
def draw_shapes cr
cr.set_source_rgb 0.6, 0.6, 0.6
cr.rectangle 20, 20, 120, 80
cr.rectangle 180, 20, 80, 80
cr.fill
cr.arc 330, 60, 40, 0, 2*Math::PI
cr.fill
cr.arc 90, 160, 40, Math::PI/4, Math::PI
cr.fill
cr.translate 220, 180
cr.scale 1, 0.7
cr.arc 0, 0, 50, 0, 2*Math::PI
cr.fill
end
end
Gtk.init
window = RubyApp.new
Gtk.main
cr.rectangle 20, 20, 120, 80These lines draw a rectangle and a square.
cr.rectangle 180, 20, 80, 80
cr.fill
cr.arc 330, 60, 40, 0, 2*Math::PIHere the
cr.fill
arc method draws a full circle. cr.translate 220, 180The
cr.scale 1, 0.7
cr.arc 0, 0, 50, 0, 2*Math::PI
cr.fill
translate method moves the object to a specific point. If we want to draw an oval, we do some scaling first. Here the scale method shrinks the y axis. 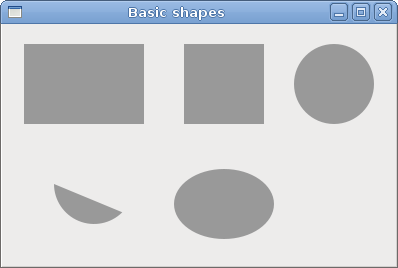
Figure: Basic shapes
Transparent rectangles
Transparency is the quality of being able to see through a material. The easiest way to understand transparency is to imagine a piece of glass or water. Technically, the rays of light can go through the glass and this way we can see objects behind the glass.In computer graphics, we can achieve transparency effects using alpha compositing. Alpha compositing is the process of combining an image with a background to create the appearance of partial transparency. The composition process uses an alpha channel. (wikipedia.org, answers.com)
#!/usr/bin/rubyIn the example we will draw ten rectangles with different levels of transparency.
# ZetCode Ruby GTK tutorial
#
# This program shows transparent
# rectangles using Cairo
#
# author: jan bodnar
# website: www.zetcode.com
# last modified: June 2009
require 'gtk2'
class RubyApp < Gtk::Window
def initialize
super
set_title "Transparent rectangles"
signal_connect "destroy" do
Gtk.main_quit
end
init_ui
set_default_size 590, 90
set_window_position Gtk::Window::POS_CENTER
show_all
end
def init_ui
@darea = Gtk::DrawingArea.new
@darea.signal_connect "expose-event" do
on_expose
end
add(@darea)
end
def on_expose
cr = @darea.window.create_cairo_context
for i in (1..10)
cr.set_source_rgba 0, 0, 1, i*0.1
cr.rectangle 50*i, 20, 40, 40
cr.fill
end
end
end
Gtk.init
window = RubyApp.new
Gtk.main
cr.set_source_rgba 0, 0, 1, i*0.1The last parameter of the
set_source_rgba method is the alpha transparency. 
Figure: Transparent rectangles
Donut
In the following example we create a complex shape by rotating a bunch of ellipses.#!/usr/bin/rubyIn this example, we create a donut. The shape resembles a cookie, hence the name donut.
# ZetCode Ruby GTK tutorial
#
# This program creates a donut
# with Cairo library
#
# author: jan bodnar
# website: www.zetcode.com
# last modified: June 2009
require 'gtk2'
class RubyApp < Gtk::Window
def initialize
super
set_title "Donut"
signal_connect "destroy" do
Gtk.main_quit
end
init_ui
set_default_size 350, 250
set_window_position Gtk::Window::POS_CENTER
show_all
end
def init_ui
@darea = Gtk::DrawingArea.new
@darea.signal_connect "expose-event" do
on_expose
end
add(@darea)
end
def on_expose
cr = @darea.window.create_cairo_context
cr.set_line_width 0.5
w = allocation.width
h = allocation.height
cr.translate w/2, h/2
cr.arc 0, 0, 120, 0, 2*Math::PI
cr.stroke
for i in (1..36)
    cr.save
    cr.rotate i*Math::PI/36
    cr.scale 0.3, 1
    cr.arc 0, 0, 120, 0, 2*Math::PI
    cr.restore
    cr.stroke
end
end
end
Gtk.init
window = RubyApp.new
Gtk.main
cr.translate w/2, h/2In the beginning there is an ellipse.
cr.arc 0, 0, 120, 0, 2*Math::PI
cr.stroke
for i in (1..36)After several rotations, there is a donut.
cr.save
cr.rotate i*Math::PI/36
cr.scale 0.3, 1
cr.arc 0, 0, 120, 0, 2*Math::PI
cr.restore
cr.stroke
end
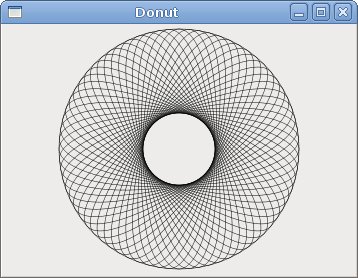
Figure: Donut
Drawing text
In the next example, we draw some text on the window.#!/usr/bin/rubyWe display part of the lyrics from the Natasha Bedingfields Soulmate song.
# ZetCode Ruby GTK tutorial
#
# This program draws text
# using Cairo
#
# author: jan bodnar
# website: www.zetcode.com
# last modified: June 2009
require 'gtk2'
class RubyApp < Gtk::Window
def initialize
super
set_title "Soulmate"
signal_connect "destroy" do
Gtk.main_quit
end
init_ui
set_default_size 370, 240
set_window_position Gtk::Window::POS_CENTER
show_all
end
def init_ui
@darea = Gtk::DrawingArea.new
@darea.signal_connect "expose-event" do
on_expose
end
add(@darea)
end
def on_expose
cr = @darea.window.create_cairo_context
cr.set_source_rgb 0.1, 0.1, 0.1
cr.select_font_face "Purisa", Cairo::FONT_SLANT_NORMAL,
    Cairo::FONT_WEIGHT_NORMAL
cr.set_font_size 13
cr.move_to 20, 30
cr.show_text "Most relationships seem so transitory"
cr.move_to 20, 60
cr.show_text "They're all good but not the permanent one"
cr.move_to 20, 120
cr.show_text "Who doesn't long for someone to hold"
cr.move_to 20, 150
cr.show_text "Who knows how to love without being told"
cr.move_to 20, 180
cr.show_text "Somebody tell me why I'm on my own"
cr.move_to 20, 210
cr.show_text "If there's a soulmate for everyone"
end
end
Gtk.init
window = RubyApp.new
Gtk.main
cr.select_font_face "Purisa", Cairo::FONT_SLANT_NORMAL,Here we specify the font, that we use. Purisa normal.
Cairo::FONT_WEIGHT_NORMAL
cr.set_font_size 13We specify the size of the font.
cr.move_to 20, 30We move to the point, where we will draw the text.
cr.show_text "Most relationships seem so transitory"The
show_text method draws text onto the window. 
Figure: Soulmate
In this chapter of the Ruby GTK tutorial, we were painting with Cairo library. Dialogs in Ruby GTK
Dialogs
In this part of the Ruby GTK programming tutorial, we will introduce dialogs.Dialog windows or dialogs are an indispensable part of most modern GUI applications. A dialog is defined as a conversation between two or more persons. In a computer application a dialog is a window which is used to "talk" to the application. A dialog is used to input data, modify data, change the application settings etc. Dialogs are important means of communication between a user and a computer program.
Message boxes
Message dialogs are convenient dialogs that provide messages to the user of the application. The message consists of textual and image data.#!/usr/bin/rubyIn our example, we will show four kinds of message dialogs. Information, Warning, Question and Error message dialogs.
# ZetCode Ruby GTK tutorial
#
# This example shows message
# dialogs
#
# author: jan bodnar
# website: www.zetcode.com
# last modified: June 2009
require 'gtk2'
class RubyApp < Gtk::Window
def initialize
super
set_title "Messages"
signal_connect "destroy" do
Gtk.main_quit
end
init_ui
set_default_size 250, 100
set_window_position Gtk::Window::POS_CENTER
show_all
end
def init_ui
table = Gtk::Table.new 2, 2, true
info = Gtk::Button.new "Information"
warn = Gtk::Button.new "Warning"
ques = Gtk::Button.new "Question"
erro = Gtk::Button.new "Error"
info.signal_connect "clicked" do
on_info
end
warn.signal_connect "clicked" do
on_warn
end
ques.signal_connect "clicked" do
on_ques
end
erro.signal_connect "clicked" do
on_erro
end
table.attach info, 0, 1, 0, 1
table.attach warn, 1, 2, 0, 1
table.attach ques, 0, 1, 1, 2
table.attach erro, 1, 2, 1, 2
add table
end
def on_info
    md = Gtk::MessageDialog.new(self,
        Gtk::Dialog::DESTROY_WITH_PARENT, Gtk::MessageDialog::INFO,
        Gtk::MessageDialog::BUTTONS_CLOSE, "Download completed")
    md.run
    md.destroy
end
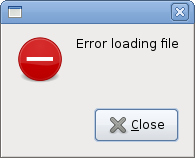
def on_erro
md = Gtk::MessageDialog.new(self, Gtk::Dialog::MODAL |
Gtk::Dialog::DESTROY_WITH_PARENT, Gtk::MessageDialog::ERROR,
Gtk::MessageDialog::BUTTONS_CLOSE, "Error loading file")
md.run
md.destroy
end
def on_ques
md = Gtk::MessageDialog.new(self,
Gtk::Dialog::DESTROY_WITH_PARENT, Gtk::MessageDialog::QUESTION,
Gtk::MessageDialog::BUTTONS_CLOSE, "Are you sure to quit?")
md.run
md.destroy
end
def on_warn
md = Gtk::MessageDialog.new(self,
Gtk::Dialog::DESTROY_WITH_PARENT, Gtk::MessageDialog::WARNING,
Gtk::MessageDialog::BUTTONS_CLOSE, "Unallowed operation")
md.run
md.destroy
end
end
Gtk.init
window = RubyApp.new
Gtk.main
info = Gtk::Button.new "Information"We have four buttons. Each of these buttons will show a different kind of message dialog.
warn = Gtk::Button.new "Warning"
ques = Gtk::Button.new "Question"
erro = Gtk::Button.new "Error"
def on_infoIf we click on the info button, the Information dialog is displayed. The
md = Gtk::MessageDialog.new(self,
Gtk::Dialog::DESTROY_WITH_PARENT, Gtk::MessageDialog::INFO,
Gtk::MessageDialog::BUTTONS_CLOSE, "Download completed")
md.run
md.destroy
end
Gtk::MessageDialog::INFO specifies the type of the dialog. The Gtk::MessageDialog::BUTTONS_CLOSE specifies the button to be displayed in the dialog. The last parameter is the message dislayed. The dialog is displayed with the run method. The programmer must also call either the destroy or the hide method. 
AboutDialog
TheAboutDialog displays information about the application. AboutDialogcan display a logo, the name of the application, version, copyright, website or licence information. It is also possible to give credits to the authors, documenters, translators and artists. #!/usr/bin/rubyThe code example uses a
# ZetCode Ruby GTK tutorial
#
# This example demonstrates the
# AboutDialog dialog
#
# author: jan bodnar
# website: www.zetcode.com
# last modified: June 2009
require 'gtk2'
class RubyApp < Gtk::Window
def initialize
super
set_title "About dialog"
signal_connect "destroy" do
Gtk.main_quit
end
init_ui
set_default_size 300, 150
set_window_position Gtk::Window::POS_CENTER
show_all
end
def init_ui
button = Gtk::Button.new "About"
button.set_size_request 80, 30
button.signal_connect "clicked" do
on_clicked
end
fix = Gtk::Fixed.new
fix.put button, 20, 20
add fix
end
def on_clicked
about = Gtk::AboutDialog.new
about.set_program_name "Battery"
about.set_version "0.1"
about.set_copyright "(c) Jan Bodnar"
about.set_comments "Battery is a simple tool for battery checking"
about.set_website "http://www.zetcode.com"
about.set_logo Gdk::Pixbuf.new "battery.png"
about.run
about.destroy
end
end
Gtk.init
window = RubyApp.new
Gtk.main
AboutDialog with some of its features. about = Gtk::AboutDialog.newWe create an
AboutDialog. about.set_program_name "Battery"Here we specify the name, the version and the copyright.
about.set_version "0.1"
about.set_copyright "(c) Jan Bodnar"
about.set_logo Gdk::Pixbuf.new "battery.png"This line creates a logo.

Figure: AboutDialog
FontSelectionDialog
TheFontSelectionDialog is a dialog for selecting fonts. It is typically used in applications, that do some text editing or formatting. #!/usr/bin/rubyIn the code example, we have a button and a label. We show the
# ZetCode Ruby GTK tutorial
#
# This example works with the
# FontSelectionDialog
#
# author: jan bodnar
# website: www.zetcode.com
# last modified: June 2009
require 'gtk2'
class RubyApp < Gtk::Window
def initialize
super
set_title "FontSelectionDialog"
signal_connect "destroy" do
Gtk.main_quit
end
init_ui
set_default_size 300, 150
set_window_position Gtk::Window::POS_CENTER
show_all
end
def init_ui
set_border_width 10
@label = Gtk::Label.new "The only victory over love is flight."
button = Gtk::Button.new "Select font"
button.signal_connect "clicked" do
on_clicked
end
fix = Gtk::Fixed.new
fix.put button, 100, 30
fix.put @label, 30, 90
add fix
end
def on_clicked
fdia = Gtk::FontSelectionDialog.new "Select font name"
response = fdia.run
if response == Gtk::Dialog::RESPONSE_OK
    font_desc = Pango::FontDescription.new fdia.font_name
    if font_desc
        @label.modify_font font_desc
    end
end
fdia.destroy
end
end
Gtk.init
window = RubyApp.new
Gtk.main
FontSelectionDialog by clicking on the button. fdia = Gtk::FontSelectionDialog.new "Select font name"We create the
FontSelectionDialog. if response == Gtk::Dialog::RESPONSE_OKIf we click on the OK button, the font of the label widget changes to the one, that we selected in the dialog.
font_desc = Pango::FontDescription.new fdia.font_name
if font_desc
@label.modify_font font_desc
end
end

Figure: FontSelectionDialog
ColorSelectionDialog
ColorSelectionDialog is a dialog for selecting a color. #!/usr/bin/rubyThe example is very similar to the previous one. This time we change the color of the label.
# ZetCode Ruby GTK tutorial
#
# This example works with the
# ColorSelectionDialog
#
# author: jan bodnar
# website: www.zetcode.com
# last modified: June 2009
require 'gtk2'
class RubyApp < Gtk::Window
def initialize
super
set_title "ColorSelectionDialog"
signal_connect "destroy" do
Gtk.main_quit
end
init_ui
set_default_size 350, 150
set_window_position Gtk::Window::POS_CENTER
show_all
end
def init_ui
set_border_width 10
@label = Gtk::Label.new "The only victory over love is flight."
button = Gtk::Button.new "Select color"
button.signal_connect "clicked" do
on_clicked
end
fix = Gtk::Fixed.new
fix.put button, 100, 30
fix.put @label, 30, 90
add fix
end
def on_clicked
cdia = Gtk::ColorSelectionDialog.new "Select color"
response = cdia.run
if response == Gtk::Dialog::RESPONSE_OK
    colorsel = cdia.colorsel
    color = colorsel.current_color
    @label.modify_fg Gtk::STATE_NORMAL, color
end
cdia.destroy
end
end
Gtk.init
window = RubyApp.new
Gtk.main
cdia = Gtk::ColorSelectionDialog.new "Select color"We create the
ColorSelectionDialog. if response == Gtk::Dialog::RESPONSE_OKIf the user pressed OK, we get the color value and modify the label's color.
colorsel = cdia.colorsel
color = colorsel.current_color
@label.modify_fg Gtk::STATE_NORMAL, color
end
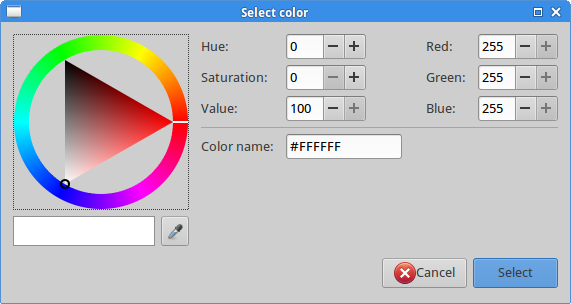
Figure: ColorSelectionDialog
In this part of the Ruby GTK tutorial, we presented dialogs. Menus And toolbars in Ruby GTK
Menus And toolbars
In this part of the Ruby GTK programming tutorial, we will work with menus & toolbars.A menubar is one of the most common parts of the GUI application. It is a group of commands located in various menus. While in console applications you have to remember all those arcane commands, here we have most of the commands grouped into logical parts. These are accepted standards that further reduce the amount of time spending to learn a new application.
Simple menu
In our first example, we will create a menubar with one file menu. The menu will have only one menu item. By selecting the item the application quits.#!/usr/bin/rubyThis is a small example with minimal menubar functionality.
# ZetCode Ruby GTK tutorial
#
# This example shows a simple menu
#
# author: jan bodnar
# website: www.zetcode.com
# last modified: June 2009
require 'gtk2'
class RubyApp < Gtk::Window
def initialize
super
set_title "Simple menu"
signal_connect "destroy" do
Gtk.main_quit
end
init_ui
set_default_size 250, 200
set_window_position Gtk::Window::POS_CENTER
show_all
end
def init_ui
modify_bg Gtk::STATE_NORMAL, Gdk::Color.new(6400, 6400, 6440)
mb = Gtk::MenuBar.new
filemenu = Gtk::Menu.new
filem = Gtk::MenuItem.new "File"
filem.set_submenu filemenu
exit = Gtk::MenuItem.new "Exit"
exit.signal_connect "activate" do
    Gtk.main_quit
end

filemenu.append exit
mb.append filem
vbox = Gtk::VBox.new false, 2
vbox.pack_start mb, false, false, 0
add vbox
end
end
Gtk.init
window = RubyApp.new
Gtk.main
mb = Gtk::MenuBar.new
MenuBar widget is created. This is a container for the menus. filemenu = Gtk::Menu.newToplevel
filem = Gtk::MenuItem.new "File"
filem.set_submenu filemenu
MenuItem is created. exit = Gtk::MenuItem.new "Exit"Exit
exit.signal_connect "activate" do
Gtk.main_quit
end
filemenu.append exit
MenuItem is created and appended to the File MenuItem. mb.append filemToplevel
MenuItem is appended to the MenuBarwidget. vbox = Gtk::VBox.new false, 2Unlike in other toolkits, we have to take care of the layout management of the menubar ourselves. We put the menubar into the vertical box.
vbox.pack_start mb, false, false, 0
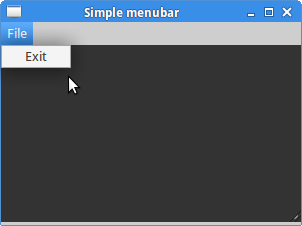
Figure: Simple menu
Submenu
Our final example demonstrates how to create a submenu.#!/usr/bin/rubySubmenu creation.
# ZetCode Ruby GTK tutorial
#
# This example shows a submenu
#
# author: jan bodnar
# website: www.zetcode.com
# last modified: June 2009
require 'gtk2'
class RubyApp < Gtk::Window
def initialize
super
set_title "Submenu"
signal_connect "destroy" do
Gtk.main_quit
end
init_ui
set_default_size 250, 200
set_window_position Gtk::Window::POS_CENTER
show_all
end
def init_ui
modify_bg Gtk::STATE_NORMAL, Gdk::Color.new(6400, 6400, 6440)
mb = Gtk::MenuBar.new
filemenu = Gtk::Menu.new
filem = Gtk::MenuItem.new "File"
filem.set_submenu filemenu
mb.append filem
imenu = Gtk::Menu.new
importm = Gtk::MenuItem.new "Import"
importm.set_submenu imenu
inews = Gtk::MenuItem.new "Import news feed..."
ibookmarks = Gtk::MenuItem.new "Import bookmarks..."
imail = Gtk::MenuItem.new "Import mail..."

imenu.append inews
imenu.append ibookmarks
imenu.append imail
filemenu.append importm
exit = Gtk::MenuItem.new "Exit"
exit.signal_connect "activate" do
Gtk.main_quit
end
filemenu.append exit
vbox = Gtk::VBox.new false, 2
vbox.pack_start mb, false, false, 0
add vbox
end
end
Gtk.init
window = RubyApp.new
Gtk.main
imenu = Gtk::Menu.newA submenu is a
Menu. importm = Gtk::MenuItem.new "Import"It is a submenu of a menu item, which belogs to toplevel file menu.
importm.set_submenu imenu
inews = Gtk::MenuItem.new "Import news feed..."Submenu has its own menu items.
ibookmarks = Gtk::MenuItem.new "Import bookmarks..."
imail = Gtk::MenuItem.new "Import mail..."
imenu.append inews
imenu.append ibookmarks
imenu.append imail
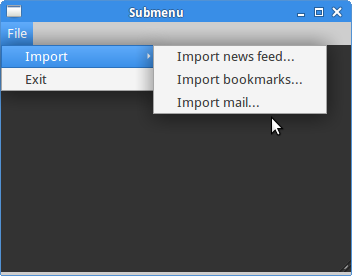
Figure: Submenu
Image menu
In the next example, we will further explore the menus. We will add images and accelerators to our menu items. Accelerators are keyboard shortcuts for activating a menu item.#!/usr/bin/rubyOur example shows a toplevel menu item with three sublevel menu items. Each of the menu items has a image and an accelerator. The accelerator for the quit menu item is active.
# ZetCode Ruby GTK tutorial
#
# This example shows a menu with
# images, accelerators and a separator
#
# author: jan bodnar
# website: www.zetcode.com
# last modified: June 2009
require 'gtk2'
class RubyApp < Gtk::Window
def initialize
super
set_title "Image menu"
signal_connect "destroy" do
Gtk.main_quit
end
init_ui
set_default_size 250, 200
set_window_position Gtk::Window::POS_CENTER
show_all
end
def init_ui
modify_bg Gtk::STATE_NORMAL, Gdk::Color.new(6400, 6400, 6440)
mb = Gtk::MenuBar.new
filemenu = Gtk::Menu.new
filem = Gtk::MenuItem.new "File"
filem.set_submenu filemenu
agr = Gtk::AccelGroup.new
add_accel_group agr
newi = Gtk::ImageMenuItem.new Gtk::Stock::NEW, agr
key, mod = Gtk::Accelerator.parse "N"
newi.add_accelerator("activate", agr, key,
    mod, Gtk::ACCEL_VISIBLE)
filemenu.append newi
openm = Gtk::ImageMenuItem.new Gtk::Stock::OPEN, agr
key, mod = Gtk::Accelerator.parse "O"
openm.add_accelerator("activate", agr, key,
mod, Gtk::ACCEL_VISIBLE)
filemenu.append openm
sep = Gtk::SeparatorMenuItem.new
filemenu.append sep
exit = Gtk::ImageMenuItem.new Gtk::Stock::QUIT, agr
key, mod = Gtk::Accelerator.parse "Q"
exit.add_accelerator("activate", agr, key,
mod, Gtk::ACCEL_VISIBLE)
exit.signal_connect "activate" do
Gtk.main_quit
end
filemenu.append exit
mb.append filem
vbox = Gtk::VBox.new false, 2
vbox.pack_start mb, false, false, 0
add vbox
end
end
Gtk.init
window = RubyApp.new
Gtk.main
agr = Gtk::AccelGroup.newTo work with accelerators, we create a global
add_accel_group agr
AccelGroupobject. It will be used later. newi = Gtk::ImageMenuItem.new Gtk::Stock::NEW, agr
key, mod = Gtk::Accelerator.parse "N"
newi.add_accelerator("activate", agr, key,
mod, Gtk::ACCEL_VISIBLE)
filemenu.append newi
ImageMenuItem is created. The image comes from the stock of images. We create also a Ctrl+N accelerator. sep = Gtk::SeparatorMenuItem.newThese lines create a separator. It is used to put menu items into logical groups.
filemenu.append sep
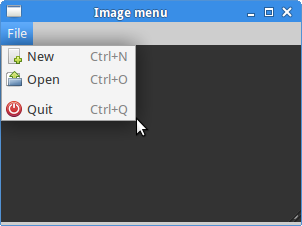
Figure: Image menu
Menus group commands that we can use in application. Toolbars provide a quick access to the most frequently used commands. Simple toolbar
Next we create a simple toolbar.#!/usr/bin/rubyThe example shows a toolbar and four tool buttons.
# ZetCode Ruby GTK tutorial
#
# This example shows a toolbar
# widget
#
# author: jan bodnar
# website: www.zetcode.com
# last modified: June 2009
require 'gtk2'
class RubyApp < Gtk::Window
def initialize
super
set_title "Toolbar"
signal_connect "destroy" do
Gtk.main_quit
end
init_ui
set_default_size 250, 200
set_window_position Gtk::Window::POS_CENTER
show_all
end
def init_ui
toolbar = Gtk::Toolbar.new
toolbar.set_toolbar_style Gtk::Toolbar::Style::ICONS
newtb = Gtk::ToolButton.new Gtk::Stock::NEW
opentb = Gtk::ToolButton.new Gtk::Stock::OPEN
savetb = Gtk::ToolButton.new Gtk::Stock::SAVE
sep = Gtk::SeparatorToolItem.new
quittb = Gtk::ToolButton.new Gtk::Stock::QUIT
toolbar.insert 0, newtb
toolbar.insert 1, opentb
toolbar.insert 2, savetb
toolbar.insert 3, sep
toolbar.insert 4, quittb
quittb.signal_connect "clicked" do
Gtk.main_quit
end
vbox = Gtk::VBox.new false, 2
vbox.pack_start toolbar, false, false, 0
add(vbox)
end
end
Gtk.init
window = RubyApp.new
Gtk.main
toolbar = Gtk::Toolbar.newA
Toolbar widget is created. toolbar.set_toolbar_style Gtk::Toolbar::Style::ICONSOn toolbar, we show only icons. No text.
newtb = Gtk::ToolButton.new Gtk::Stock::NEWA
ToolButton with an image from stock is created. The image comes from the built-in stock of images. sep = Gtk::SeparatorToolItem.newThis is a separator. It can be used to put toolbar buttons into logical groups.
toolbar.insert 0, newtbToolbar buttons are inserted into the toolbar widget.
toolbar.insert 1, opentb
...
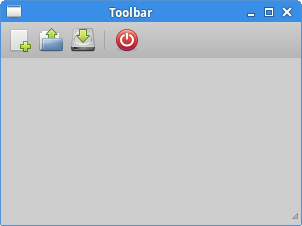
Figure: Toolbar
Undo redo
The following example demonstrates, how we can deactivate toolbar buttons on the toolbar. It is a common practise in GUI programming. For example the save button. If we save all changes of our document to the disk, the save button is deactivated in most text editors. This way the application indicates to the user, that all changes are already saved.#!/usr/bin/rubyOur example creates undo and redo buttons from the GTK stock resources. After several clicks each of the buttons is deactivated. The buttons are grayed out.
# ZetCode Ruby GTK tutorial
#
# This example shows how to
# activate/deactivate a ToolButton
#
# author: jan bodnar
# website: www.zetcode.com
# last modified: June 2009
require 'gtk2'
class RubyApp < Gtk::Window
def initialize
super
set_title "Undo redo"
signal_connect "destroy" do
Gtk.main_quit
end
@count = 2
init_ui
set_default_size 250, 200
set_window_position Gtk::Window::POS_CENTER
show_all
end
def init_ui
toolbar = Gtk::Toolbar.new
toolbar.set_toolbar_style Gtk::Toolbar::Style::ICONS
@undo = Gtk::ToolButton.new Gtk::Stock::UNDO
@redo = Gtk::ToolButton.new Gtk::Stock::REDO
sep = Gtk::SeparatorToolItem.new
quit = Gtk::ToolButton.new Gtk::Stock::QUIT
toolbar.insert 0, @undo
toolbar.insert 1, @redo
toolbar.insert 2, sep
toolbar.insert 3, quit
@undo.signal_connect "clicked" do
    on_undo
end
@redo.signal_connect "clicked" do
on_redo
end
quit.signal_connect "clicked" do
Gtk.main_quit
end
vbox = Gtk::VBox.new false, 2
vbox.pack_start toolbar, false, false, 0
self.add vbox
end
def on_undo
@count = @count - 1
if @count <= 0
    @undo.set_sensitive false
    @redo.set_sensitive true
end
end
def on_redo
@count = @count + 1
if @count >= 5
@redo.set_sensitive false
@undo.set_sensitive true
end
end
end
Gtk.init
window = RubyApp.new
Gtk.main
@count = 2The
@count variable decides, which button is activated or deactivated. @undo = Gtk::ToolButton.new Gtk::Stock::UNDOWe have two tool buttons. Undo and redo tool buttons. Images come from the stock resources.
@redo = Gtk::ToolButton.new Gtk::Stock::REDO
@undo.signal_connect "clicked" doClicking on the undo button, we trigger the
on_undo
end
on_undo method. if @count <= 0To activate or deactivate a widget, we use the
@undo.set_sensitive false
@redo.set_sensitive true
end
set_sensitive method 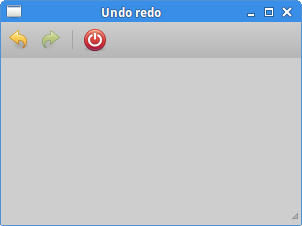
Figure: Undo redo
In this chapter of the Ruby GTK tutorial, we showed, how to work with menus & toolbars. Widgets in Ruby GTK
Widgets
In this part of the Ruby GTK programming tutorial, we will introduce some widgets.Widgets are basic building blocks of a GUI application. Over the years, several widgets became a standard in all toolkits on all OS platforms. For example a button, a check box or a scroll bar. The GTK toolkit's philosophy is to keep the number of widgets at a minimum level. More specialized widgets are created as custom GTK widgets.
CheckButton
CheckButton is a widget, that has two states. On and Off. The On state is visualised by a check mark. It is used to denote some boolean property. #!/usr/bin/rubyWe will display a title in the titlebar of the window, depending on the state of the
# ZetCode Ruby GTK tutorial
#
# This program toggles the title of the
# window with the CheckButton widget
#
# author: jan bodnar
# website: www.zetcode.com
# last modified: April 2009
require 'gtk2'
class RubyApp < Gtk::Window
def initialize
super
set_title "CheckButton"
signal_connect "destroy" do
Gtk.main_quit
end
init_ui
set_default_size 250, 200
set_window_position Gtk::Window::POS_CENTER
show_all
end
def init_ui
fixed = Gtk::Fixed.new
add fixed
cb = Gtk::CheckButton.new "Show title"
cb.set_active true
cb.set_can_focus false
cb.signal_connect("clicked") do |w|
on_clicked(w)
end
fixed.put cb, 50, 50
end
def on_clicked sender
if sender.active?
    self.set_title "Check Button"
else
    self.set_title ""
end
end
end
Gtk.init
window = RubyApp.new
Gtk.main
CheckButton. cb = Gtk::CheckButton.new "Show title"
CheckButton widget is created. cb.set_active trueThe title is visible by default, so we check the check button by default.
if sender.active?We show the title, if the button is checked.
self.set_title "Check Button"
else
self.set_title ""
end
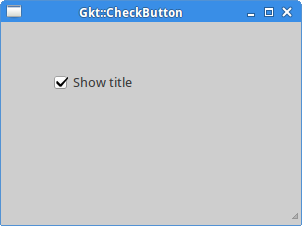
Figure: CheckButton
Label
TheLabel widget shows text. #!/usr/bin/rubyThe code example shows some lyrics on the window.
# ZetCode Ruby GTK tutorial
#
# This example demonstrates the Label widget
#
# author: jan bodnar
# website: www.zetcode.com
# last modified: June 2009
require 'gtk2'
$lyrics = %{Meet you downstairs in the bar and heard
your rolled up sleeves and your skull t-shirt
You say why did you do it with him today?
and sniff me out like I was Tanqueray
cause you're my fella, my guy
hand me your stella and fly
by the time I'm out the door
you tear men down like Roger Moore
I cheated myself
like I knew I would
I told ya, I was trouble
you know that I'm no good}
class RubyApp < Gtk::Window
def initialize
super
set_title "You know I'm no Good"
signal_connect "destroy" do
Gtk.main_quit
end
init_ui
set_default_size 250, 200
set_window_position Gtk::Window::POS_CENTER
show_all
end
def init_ui
set_border_width 10
label = Gtk::Label.new $lyrics
add label
end
end
Gtk.init
window = RubyApp.new
Gtk.main
 $lyrics = %{Meet you downstairs in the bar and heard
 your rolled up sleeves and your skull t-shirt
 ...
We create a multi line text. set_border_width 10The
Label is surrounded by some empty space. label = Gtk::Label.new $lyricsThe
add label
Label widget is created and added to the window. 
Figure: Label Widget
Entry
TheEntry is a single line text entry field. This widget is used to enter textual data. #!/usr/bin/rubyThis example shows an entry widget and a label. The text that we key in the entry is displayed immediately in the label widget.
# ZetCode Ruby GTK tutorial
#
# This example demonstrates the Entry widget
#
# author: jan bodnar
# website: www.zetcode.com
# last modified: June 2009
require 'gtk2'
class RubyApp < Gtk::Window
def initialize
super
set_title "Entry"
signal_connect "destroy" do
Gtk.main_quit
end
init_ui
set_default_size 250, 200
set_window_position Gtk::Window::POS_CENTER
show_all
end
def init_ui
fixed = Gtk::Fixed.new
label = Gtk::Label.new "..."
fixed.put label, 60, 40
entry = Gtk::Entry.new
fixed.put entry, 60, 100
entry.signal_connect "key-release-event" do |w, e|
    on_key_release(w, e, label)
end
add(fixed)
end
def on_key_release sender, event, label
    label.set_text sender.text
end
end
Gtk.init
window = RubyApp.new
Gtk.main
entry = Gtk::Entry.new
Entry widget is created. entry.signal_connect "key-release-event" do |w, e|We plug the
on_key_release(w, e, label)
end
on_key_release method to the key-release-event of the Entry widget. def on_key_release sender, event, labelWe get the text from the
label.set_text sender.text
end
Entry widget and set it to the label. 
Figure: Entry Widget
Image
TheImage widget shows an image. #!/usr/bin/rubyIn our example, we show an image on the window.
# ZetCode Ruby GTK tutorial
#
# This example demonstrates the Image widget
#
# author: jan bodnar
# website: www.zetcode.com
# last modified: June 2009
require 'gtk2'
class RubyApp < Gtk::Window
def initialize
super
set_title "Red Rock"
signal_connect "destroy" do
Gtk.main_quit
end
init_ui
set_default_size 250, 200
set_window_position Gtk::Window::POS_CENTER
show_all
end
def init_ui
set_border_width 2
begin
    image = Gtk::Image.new "redrock.png"
rescue
    puts "cannot load image"
    exit
end
add image
end
end
Gtk.init
window = RubyApp.new
Gtk.main
set_border_width 2We put some empty border around the image.
beginThe
image = Gtk::Image.new "redrock.png"
rescue
puts "cannot load image"
exit
end
Image widget is created. IO operations are error prone, so we handle the possible exceptions. add imageWidget is added to the container.

Figure: Image widget
ComboBox
ComboBox is a widget that allows the user to choose from a list of options. #!/usr/bin/rubyThe example shows a combo box and a label. The combo box has a list of five options. These are the names of Linux Distros. The label widget shows the selected option from the combo box.
# ZetCode Ruby GTK tutorial
#
# This example demonstrates the ComboBox widget
#
# author: jan bodnar
# website: www.zetcode.com
# last modified: June 2009
require 'gtk2'
class RubyApp < Gtk::Window
def initialize
super
set_title "ComboBox"
signal_connect "destroy" do
Gtk.main_quit
end
init_ui
set_default_size 250, 200
set_window_position Gtk::Window::POS_CENTER
show_all
end
def init_ui
fixed = Gtk::Fixed.new
label = Gtk::Label.new '-'
fixed.put label, 50, 140
cb = Gtk::ComboBox.new
cb.signal_connect "changed" do |w, e|
on_changed(w, e, label)
end
cb.append_text 'Ubuntu'
cb.append_text 'Mandriva'
cb.append_text 'Redhat'
cb.append_text 'Gento'
cb.append_text 'Mint'
fixed.put cb, 50, 30
add fixed
end
def on_changed sender, event, label
    label.set_label sender.active_text
end
end
Gtk.init
window = RubyApp.new
Gtk.main
cb = Gtk::ComboBox.newThe
ComboBox widget is created. cb.append_text 'Ubuntu'It is filled with data.
cb.append_text 'Mandriva'
cb.append_text 'Redhat'
cb.append_text 'Gento'
cb.append_text 'Mint'
def on_changed sender, event, labelInside the
label.set_label sender.active_text
end
on_changed method, we get the selected text out of the combo box and set it to the label. 
Figure: ComboBox
In this chapter of the Ruby GTK tutorial, we showed some basic widgets. Layout management in Ruby GTK
Layout management
In this chapter we will show how to lay out our widgets in windows or dialogs.When we design the GUI of our application, we decide what widgets we will use and how we will organize those widgets in the application. To organize our widgets, we use specialized non visible widgets called layout containers. In this chapter, we will mention
Alignment, Fixed, VBox and Table. Fixed
TheFixed container places child widgets at fixed positions and with fixed sizes. This container performs no automatic layout management. In most applications, we don't use this container. There are some specialized areas, where we use it. For example games, specialized applications that work with diagrams, resizable components that can be moved (like a chart in a spreadsheet application), small educational examples. #!/usr/bin/rubyIn our example, we show three small images on the window. We explicitely specify the x, y coordinates, where we place these images.
# ZetCode Ruby GTK tutorial
#
# In this program, we lay out widgets
# using absolute positioning
#
# author: jan bodnar
# website: www.zetcode.com
# last modified: June 2009
require 'gtk2'
class RubyApp < Gtk::Window
def initialize
super
set_title "Fixed"
signal_connect "destroy" do
Gtk.main_quit
end
init_ui
set_default_size 300, 280
set_window_position Gtk::Window::POS_CENTER
show_all
end
def init_ui
modify_bg Gtk::STATE_NORMAL, Gdk::Color.new(6400, 6400, 6440)
begin
bardejov = Gdk::Pixbuf.new "bardejov.jpg"
rotunda = Gdk::Pixbuf.new "rotunda.jpg"
mincol = Gdk::Pixbuf.new "mincol.jpg"
rescue IOError => e
puts e
puts "cannot load images"
exit
end
image1 = Gtk::Image.new bardejov
image2 = Gtk::Image.new rotunda
image3 = Gtk::Image.new mincol
fixed = Gtk::Fixed.new
fixed.put image1, 20, 20
fixed.put image2, 40, 160
fixed.put image3, 170, 50
add fixed
end
end
Gtk.init
window = RubyApp.new
Gtk.main
modify_bg Gtk::STATE_NORMAL, Gdk::Color.new(6400, 6400, 6440)For better visual experience, we change the background color to dark gray.
bardejov = Gdk::Pixbuf.new "bardejov.jpg"We load the image from the disk to the
Pixbuf object. image1 = Gtk::Image.new bardejovThe
image2 = Gtk::Image.new rotunda
image3 = Gtk::Image.new mincol
Image is a widget, that is used to display images. It takes Pixbuf object in the constructor. fixed = Gtk::Fixed.newWe create the
Fixed container. fixed.put image1, 20, 20We place the first image at x=20, y=20 coordinates.
add fixedFinally, we add the
Fixed container to the Window. 
Figure: Fixed
Buttons
TheAlignment container controls the alignment and the size of its child widget. #!/usr/bin/rubyIn the code example, we place two buttons into the right bottom corner of the window. To accomplish this, we use one horizontal box and one vertical box and two alignment containers.
# ZetCode Ruby GTK tutorial
#
# In this program, we position two buttons
# in the bottom right corner of the window.
# We use horizontal and vertical boxes.
#
# author: jan bodnar
# website: www.zetcode.com
# last modified: June 2009
require 'gtk2'
class RubyApp < Gtk::Window
def initialize
super
set_title "Buttons"
signal_connect "destroy" do
Gtk.main_quit
end
init_ui
set_default_size 260, 150
set_window_position Gtk::Window::POS_CENTER
show_all
end
def init_ui
vbox = Gtk::VBox.new false, 5
hbox = Gtk::HBox.new true, 3
valign = Gtk::Alignment.new 0, 1, 0, 0
vbox.pack_start valign
ok = Gtk::Button.new "OK"
ok.set_size_request 70, 30
close = Gtk::Button.new "Close"
hbox.add ok
hbox.add close
halign = Gtk::Alignment.new 1, 0, 0, 0
halign.add hbox

vbox.pack_start halign, false, false, 3
add vbox
end
end
Gtk.init
window = RubyApp.new
Gtk.main
valign = Gtk::Alignment.new 0, 1, 0, 0This will put the child widget to the bottom.
vbox.pack_start valignHere we place the
Alignment widget into the vertical box. hbox = Gtk::HBox.new true, 3We create a horizontal box and put two buttons inside it.
...
ok = Gtk::Button.new "OK"
ok.set_size_request 70, 30
close = Gtk::Button.new "Close"
hbox.add ok
hbox.add close
halign = Gtk::Alignment.new 1, 0, 0, 0This will create an alignment container that will place its child widget to the right. We add the horizontal box into the alignment container and pack the alignment container into the vertical box. We must keep in mind that the alignment container takes only one child widget. That's why we must use boxes.
halign.add hbox
vbox.pack_start halign, false, false, 3
Figure: Buttons
Calculator skeleton
TheTable widget arranges widgets in rows and columns. #!/usr/bin/rubyWe use the
# ZetCode Ruby GTK tutorial
#
# In this program we create a skeleton of
# a calculator. We use the Table widget.
#
# author: jan bodnar
# website: www.zetcode.com
# last modified: June 2009
require 'gtk2'
class RubyApp < Gtk::Window
def initialize
super
set_title "Calculator"
signal_connect "destroy" do
Gtk.main_quit
end
init_ui
set_default_size 300, 250
set_window_position Gtk::Window::POS_CENTER
show_all
end
def init_ui
vbox = Gtk::VBox.new false, 2
mb = Gtk::MenuBar.new
filemenu = Gtk::Menu.new
file = Gtk::MenuItem.new "File"
file.set_submenu filemenu
mb.append file
vbox.pack_start mb, false, false, 0
table = Gtk::Table.new 5, 4, true
table.attach Gtk::Button.new("Cls"), 0, 1, 0, 1
table.attach Gtk::Button.new("Bck"), 1, 2, 0, 1
table.attach Gtk::Label.new, 2, 3, 0, 1
table.attach Gtk::Button.new("Close"), 3, 4, 0, 1
table.attach Gtk::Button.new("7"), 0, 1, 1, 2
table.attach Gtk::Button.new("8"), 1, 2, 1, 2
table.attach Gtk::Button.new("9"), 2, 3, 1, 2
table.attach Gtk::Button.new("/"), 3, 4, 1, 2
table.attach Gtk::Button.new("4"), 0, 1, 2, 3
table.attach Gtk::Button.new("5"), 1, 2, 2, 3
table.attach Gtk::Button.new("6"), 2, 3, 2, 3
table.attach Gtk::Button.new("*"), 3, 4, 2, 3
table.attach Gtk::Button.new("1"), 0, 1, 3, 4
table.attach Gtk::Button.new("2"), 1, 2, 3, 4
table.attach Gtk::Button.new("3"), 2, 3, 3, 4
table.attach Gtk::Button.new("-"), 3, 4, 3, 4
table.attach Gtk::Button.new("0"), 0, 1, 4, 5
table.attach Gtk::Button.new("."), 1, 2, 4, 5
table.attach Gtk::Button.new("="), 2, 3, 4, 5
table.attach Gtk::Button.new("+"), 3, 4, 4, 5
vbox.pack_start Gtk::Entry.new, false, false, 0
vbox.pack_end table, true, true, 0
add vbox
end
end
Gtk.init
window = RubyApp.new
Gtk.main
Table widget to create a calculator skeleton. table = Gtk::Table.new 5, 4, trueWe create a table widget with 5 rows and 4 columns. The third parameter is the homogenous parameter. If set to true, all the widgets in the table are of same size. The size of all widgets is equal to the largest widget in the table container.
table.attach Gtk::Button.new("Cls"), 0, 1, 0, 1
We attach a button to the table container. To the top-left cell of the table. The first two parameters are the left and right sides of the cell, the last two parameters are the top and left sides of the cell. vbox.pack_end table, true, true, 0We pack the table widget into the vertical box.
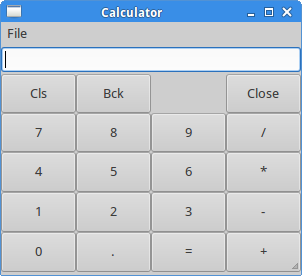
Figure: Calculator skeleton
Windows
Next we will create a more advanced example. We show a window, that can be found in the JDeveloper IDE.#!/usr/bin/rubyThe code example shows, how we can create a similar window in Ruby GTK.
# ZetCode Ruby GTK tutorial
#
# This is a more complicated layout example.
# We use Alignment and Table widgets.
#
# author: jan bodnar
# website: www.zetcode.com
# last modified: June 2009
require 'gtk2'
class RubyApp < Gtk::Window
def initialize
super
set_title "Windows"
signal_connect "destroy" do
Gtk.main_quit
end
init_ui
set_default_size 300, 250
set_window_position Gtk::Window::POS_CENTER
show_all
end
def init_ui
set_border_width 15
table = Gtk::Table.new 8, 4, false
table.set_column_spacings 3
title = Gtk::Label.new "Windows"

halign = Gtk::Alignment.new 0, 0, 0, 0
halign.add title

table.attach(halign, 0, 1, 0, 1, Gtk::FILL,
    Gtk::FILL, 0, 0)
frame = Gtk::Frame.new
table.attach(frame, 0, 2, 1, 3, Gtk::FILL | Gtk::EXPAND,
    Gtk::FILL | Gtk::EXPAND, 1, 1)
activate = Gtk::Button.new "Activate"
activate.set_size_request 50, 30
table.attach(activate, 3, 4, 1, 2, Gtk::FILL,
Gtk::SHRINK, 1, 1)
valign = Gtk::Alignment.new 0, 0, 0, 0
close = Gtk::Button.new "Close"
close.set_size_request 70, 30
valign.add close
table.set_row_spacing 1, 3
table.attach(valign, 3, 4, 2, 3, Gtk::FILL,
    Gtk::FILL | Gtk::EXPAND, 1, 1)
halign2 = Gtk::Alignment.new 0, 1, 0, 0
help = Gtk::Button.new "Help"
help.set_size_request 70, 30
halign2.add help
table.set_row_spacing 3, 6
table.attach(halign2, 0, 1, 4, 5, Gtk::FILL,
Gtk::FILL, 0, 0)
ok = Gtk::Button.new "OK"
ok.set_size_request 70, 30
table.attach(ok, 3, 4, 4, 5, Gtk::FILL,
Gtk::FILL, 0, 0)
add table
end
end
Gtk.init
window = RubyApp.new
Gtk.main
table = Gtk::Table.new 8, 4, falseThe example is based on the
table.set_column_spacings 3
Table container. There will be 3px space between columns. title = Gtk::Label.new "Windows"This code creates a label, that is aligned to the left. The label is placed in the first row of the Table container.
halign = Gtk::Alignment.new 0, 0, 0, 0
halign.add title
table.attach(halign, 0, 1, 0, 1, Gtk::FILL,
Gtk::FILL, 0, 0)
frame = Gtk::Frame.newThe frame view widget spans two rows and two columns.
table.attach(frame, 0, 2, 1, 3, Gtk::FILL | Gtk::EXPAND,
Gtk::FILL | Gtk::EXPAND, 1, 1)
valign = Gtk::Alignment.new 0, 0, 0, 0We put the close button next to the frame widget into the fourth column. (we count from zero) We add the button into the alignment widget, so that we can align it to the top.
close = Gtk::Button.new "Close"
close.set_size_request 70, 30
valign.add close
table.set_row_spacing 1, 3
table.attach(valign, 3, 4, 2, 3, Gtk::FILL,
Gtk::FILL | Gtk::EXPAND, 1, 1)
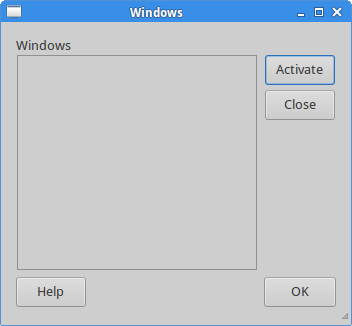
Figure: Windows
In this part of the Ruby GTK tutorial, we mentioned layout management of widgets. Introduction to Ruby GTK
Introduction to Ruby GTK
In this part of the Ruby GTK programming tutorial, we will introduce the GTK library and create our first programs using the Ruby programming language.The purpose of this tutorial is to get you started with the GTK and Ruby. Images for the Nibbles game can be downloaded here.
About
GTK is one of the leading toolkits for creating graphical user interfaces. Ruby is a popular scripting language.Simple example
In the first example, we create a simple window. The window is centered on the screen.#!/usr/bin/rubyThis example shows a 250x200 px window in the centre of the screen.
# ZetCode Ruby GTK tutorial
#
# This program centers a window on
# the screen
#
# author: jan bodnar
# website: www.zetcode.com
# last modified: April 2009
require 'gtk2'
class RubyApp < Gtk::Window
def initialize
super
set_title "Center"
signal_connect "destroy" do
    Gtk.main_quit
end
set_default_size 250, 200
set_window_position Gtk::Window::POS_CENTER
show
end
end
Gtk.init
    window = RubyApp.new
Gtk.main
require 'gtk2'The
require keyword imports necessery types that we will use in the application. class RubyApp < Gtk::WindowThe example inherits from a
Window. The Window is a toplevel container. set_title "Center"We set a title for the window.
signal_connect "destroy" doThe
Gtk.main_quit
end
destroy event is triggered, when we click on the close button in the titlebar. Or press Alt + F4. The method main_quit quits the application for good. set_default_size 250, 200We set a default size for the application window.
set_window_position Gtk::Window::POS_CENTERThis line centers the window on the screen.
showWhen everything is ready, we show the window on the screen.
Gtk.initThese three lines set up the application.
window = RubyApp.new
Gtk.main
Creating a Tooltip
The second example will show a tooltip. A tooltip is a small rectangular window, which gives a brief information about an object. It is usually a GUI component. It is part of the help system of the application.#!/usr/bin/rubyThe example creates a window. If we hover a mouse pointer over the area of the window, a tooltip pops up.
# ZetCode Ruby GTK tutorial
#
# This code shows a tooltip on
# a window and a button
#
# author: jan bodnar
# website: www.zetcode.com
# last modified: June 2009
require 'gtk2'
class RubyApp < Gtk::Window
def initialize
super
set_title "Tooltips"
signal_connect "destroy" do
Gtk.main_quit
end
fixed = Gtk::Fixed.new
add fixed
button = Gtk::Button.new "Button"
button.set_size_request 80, 35
button.set_tooltip_text "Button widget"
fixed.put button, 50, 50
set_tooltip_text "Window widget"
set_default_size 250, 200
set_window_position Gtk::Window::POS_CENTER
show_all
end
end
Gtk.init
window = RubyApp.new
Gtk.main
button.set_tooltip_text "Button widget"We set a tooltip with the
set_tooltip_text method. 
Figure: Tooltip
Quit button
In the last example of this section, we will create a quit button. When we press this button, the application terminates.#!/usr/bin/rubyWe use a
# ZetCode Ruby GTK tutorial
#
# This program creates a quit
# button. When we press the button,
# the application terminates.
#
# author: jan bodnar
# website: www.zetcode.com
# last modified: June 2009
require 'gtk2'
class RubyApp < Gtk::Window
def initialize
super
set_title "Quit button"
signal_connect "destroy" do
Gtk.main_quit
end
init_ui
show_all
end
def init_ui
fixed = Gtk::Fixed.new
add fixed
button = Gtk::Button.new "Quit"
button.set_size_request 80, 35
button.signal_connect "clicked" do
    Gtk.main_quit
end
fixed.put button, 50, 50
set_default_size 250, 200
set_window_position Gtk::Window::POS_CENTER
end
end
Gtk.init
window = RubyApp.new
Gtk.main
Button widget. This is a very common widget. It shows a text label, image or both. init_uiWe delegate the creation of the user interface to the
init_ui method. show_allWe have two options. Either to call
show on all widgets, or to call show_all, which shows the container and all its children. button = Gtk::Button.new "Quit"Here we create a button widget.
button.set_size_request 80, 35We set a size for a button.
button.signal_connect "clicked" doWe plug the
Gtk.main_quit
end
main_quit method to the button clicked event. fixed.put button, 50, 50We put the quit button into the fixed container at x=50, y=50.
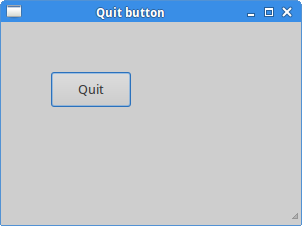
Figure: Quit button
This section was an introduction to the GTK library with the Ruby language.
Subscribe to:
Posts (Atom)