Menus & toolbars
In this part of the Tcl/Tk tutorial, we will work with menus and a toolbar.A menubar is one of the most visible parts of the GUI application. It is a group of commands located in various menus. While in console applications you had to remember all those arcane commands, here we have most of the commands grouped into logical parts. There are accepted standards that further reduce the amount of time spending to learn a new application. Menus group commands that we can use in an application. Toolbars provide a quick access to the most frequently used commands.
Simple menu
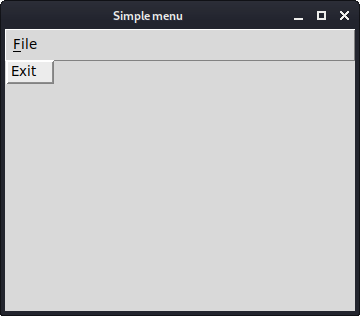
The first example will show a simple menu.#!/usr/bin/wishOur example will show a File menu with one item. By selecting the exit menu item we close the application.
# ZetCode Tcl/Tk tutorial
#
# In this code example, we create
# a simple menu.
#
# author: Jan Bodnar
# last modified: March 2011
# website: www.zetcode.com
menu .mbar
. configure -menu .mbar
menu .mbar.fl -tearoff 0
.mbar add cascade -menu .mbar.fl -label File \
    -underline 0
.mbar.fl add command -label Exit -command { exit }
wm title . "Simple menu"
wm geometry . 250x150+300+300
menu .mbarWe create a menubar. A menubar is a special case of a menu.
. configure -menu .mbar
menu .mbar.fl -tearoff 0File menu is created. The -tearoff option specifies that the menu cannot be removed from the menubar.
.mbar add cascade -menu .mbar.fl -label File \We add the file menu to the menubar. The -underline option underlines the first character of the label. Now the menu can be pulled down with the Alt + F shortcut.
-underline 0
.mbar.fl add command -label Exit -command { exit }
An Exit command is added to the File menu. This will create a menu item. When the menu item is selected, the application terminates. 
Figure: Simple menu
Submenu
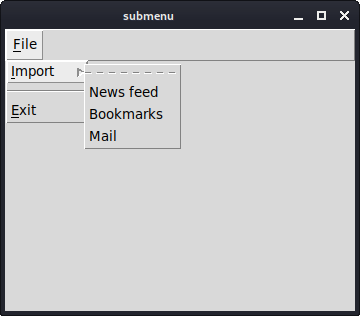
A submenu is a menu plugged into another menu object. The next example demonstrates this.#!/usr/bin/wishIn the example, we have three options in a submenu of a file menu. We create a separator and keyboard shortcuts.
# ZetCode Tcl/Tk tutorial
#
# In this code example, we create
# a submenu.
#
# author: Jan Bodnar
# last modified: March 2011
# website: www.zetcode.com
menu .mbar
. configure -menu .mbar
menu .mbar.fm -tearoff 0
.mbar add cascade -menu .mbar.fm -label File \
-underline 0
menu .mbar.fm.sb
.mbar.fm.sb add command -label "News feed"
.mbar.fm.sb add command -label Bookmarks
.mbar.fm.sb add command -label Mail
.mbar.fm add cascade -label Import -menu \
    .mbar.fm.sb -underline 0
.mbar.fm add separator
.mbar.fm add command -label Exit -underline 0 \
-command {exit}
wm title . submenu
wm geometry . 250x150+300+300
menu .mbar.fm.sbWe have a submenu with three commands. The submenu is a regular menu. Note the hierarchy of the widget path name.
.mbar.fm.sb add command -label "News feed"
.mbar.fm.sb add command -label Bookmarks
.mbar.fm.sb add command -label Mail
.mbar.fm add cascade -label Import -menu \By adding the menu to the File menu and not to the menubar, we create a submenu. The underline parameter creates a keyboard shortcut. We provide a character position, which should be underlined. In our case it is the first. Positions start from zero. When we click on the File menu, a popup window is shown. The Import menu has one character underlined. We can select it either with the mouse pointer, or with the Alt + I shortcut.
.mbar.fm.sb -underline 0
.mbar.fm add separatorA separator is a horizontal line that visually separates the menu commands. This way we can group items into some logical places.

Figure: Submenu
Popup menu
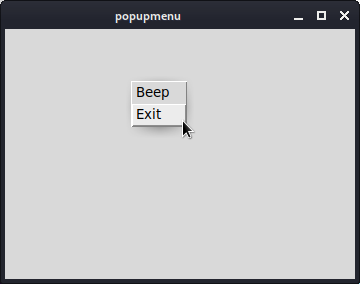
In the next example, we create a popup menu. Popup menu is also called a context menu. It can be shown anywhere on the client area of a window.#!/usr/bin/wishIn our example, we create a popup menu with two commands.
# ZetCode Tcl/Tk tutorial
#
# In this code example, we create
# a popup menu.
#
# author: Jan Bodnar
# last modified: March 2011
# website: www.zetcode.com
menu .m -tearoff 0
.m add command -label Beep
.m add command -label Exit -command {exit}
bind . "<Button-3>" "showMenu %X %Y"
wm title . popupmenu
wm geometry . 250x150+300+300
proc showMenu {x y} {
    tk_popup .m $x $y
}
menu .m -tearoff 0A context menu is a regular
.m add command -label Beep
.m add command -label Exit -command {exit}
menu widget. The tearoff feature is turned off. bind . "<Button-3>" "showMenu %X %Y"We bind the <Button-3> event to the showMenu procedure. The event is generated when we right click on the client area of the window. We pass two parameters to the procedure. These are the x, y coordinates of the mouse click.
proc showMenu {x y} {
tk_popup .m $x $y
}
The showMenu procedure shows the context menu. The popup menu is shown at the x, y coordinates of the mouse click. To display the popup menu, we use the tk_popup command. 
Figure: Popup menu
Toolbar
Menus group commands that we can use in an application. Toolbars provide a quick access to the most frequently used commands. There is no toolbar widget in Tk.#!/usr/bin/wishOur toolbar will be a frame on which we will put a button.
# ZetCode Tcl/Tk tutorial
#
# In this code example, we create
# a toolbar.
#
# author: Jan Bodnar
# last modified: March 2011
# website: www.zetcode.com
package require Img
menu .mbar
. configure -menu .mbar
menu .mbar.fl -tearoff 0
.mbar add cascade -menu .mbar.fl -label File \
-underline 0
frame .toolbar -bd 1 -relief raised
image create photo img -file "exit.png"
button .toolbar.exitButton -image img -relief flat -command {exit}
pack .toolbar.exitButton -side left -padx 2 -pady 2
pack .toolbar -fill x
wm title . toolbar
wm geometry . 250x150+300+300
frame .toolbar -bd 1 -relief raisedA toolbar is created. It is a
frame. We created a raised border, so that the boundaries of a toolbar are visible. image create photo img -file "exit.png"An exit button with an image is created.
button .toolbar.exitButton -image img -relief flat -command {exit}
pack .toolbar.exitButton -side left -padx 2 -pady 2The toolbar is a frame and a frame is a container widget. We pack the button to the left side. We add some padding.
pack .toolbar -fill xThe toolbar is packed to the root window. It is horizontally stretched.

Figure: Toolbar
In this part of the Tcl/Tk tutorial, we have shown how to create a menubar with menus and menu items and a toolbar.
No comments:
Post a Comment